Mushroom Cultivation
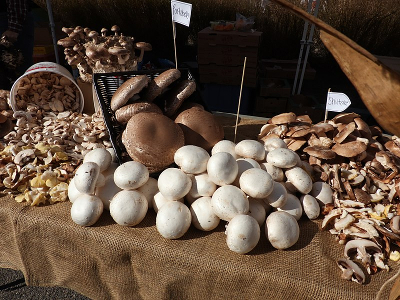
An Overview on How to Grow Mushrooms in Your Home & Garden
Mushroom Cultivation By Ben Mardis
Most of the time, when someone asks me what I did this past weekend my response is something like this “Oh, you know, did some work in the garden, worked on some mushroom cultivation projects, and some other stuff, what about you?”
I propagate mycelium and grow several different species of edible mushrooms. Personally, I only eat a small portion of the fresh ones I grow, most of what I harvest gets dried and powdered for tea and for tossing in soups and quiche (We often have a surplus of chicken eggs at my place). I also incorporate some of the mycelium I propagate in my garden to support the soil and the local bees. All of my spent mushroom blocks get distributed into the garden after they have given me a few flushes of mushrooms.
Growing mushrooms is a fun and rewarding experience and can be as easy as buying a ready to grow mushroom kit that you just water like a potted plant. On the other side of the spectrum it can get as in-depth and equipment heavy as growing out your own fungal cultures in petri dishes to later distribute into a growing substrate from which your mushrooms will emerge.
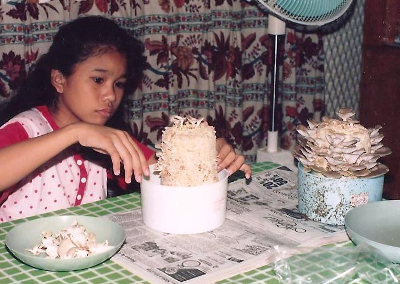
Benefits of Learning Mushroom Cultivation
There are so many health benefits to incorporating certain fungi into your diet. Some cultures have been using mushrooms for the past two-thousand years as medicine and important dietary staples for maintaining good health. Diving into the health benefits of mushrooms (and mycelium) is beyond the scope of this article however if you are interested, I recommend starting by looking up Paul Stamets (a well-known mycologist here in the Pacific Northwest) and watching some of his presentations then reading through his papers and books.
Growing your own mushrooms is also a great way to build up the soil health in your garden. Just as veins distribute blood throughout our bodies, many species of fungi create a network of mycelial webs underground that are crucial to the dispersal of nutrients in the soil to the plants above. If you aren’t familiar with the concept of hugelkultur garden beds, imagine a normal topsoil and compost bed stacked on top of a hefty layer of logs, twigs, and leaves. Now imagine using the mushrooms you grow to incorporate mycelium into the soil ecology that will help feed your plants, add biodiversity, and break down the woody material in the garden bed. This will eventually create a nice, deep garden bed that plants will flourish in. A garden bed like this will also retain moisture very well so that you won't have to water as often.
Alright, so you want to grow mushrooms? There are two worlds to dive into if you so choose:
Types of Mushroom Cultivation
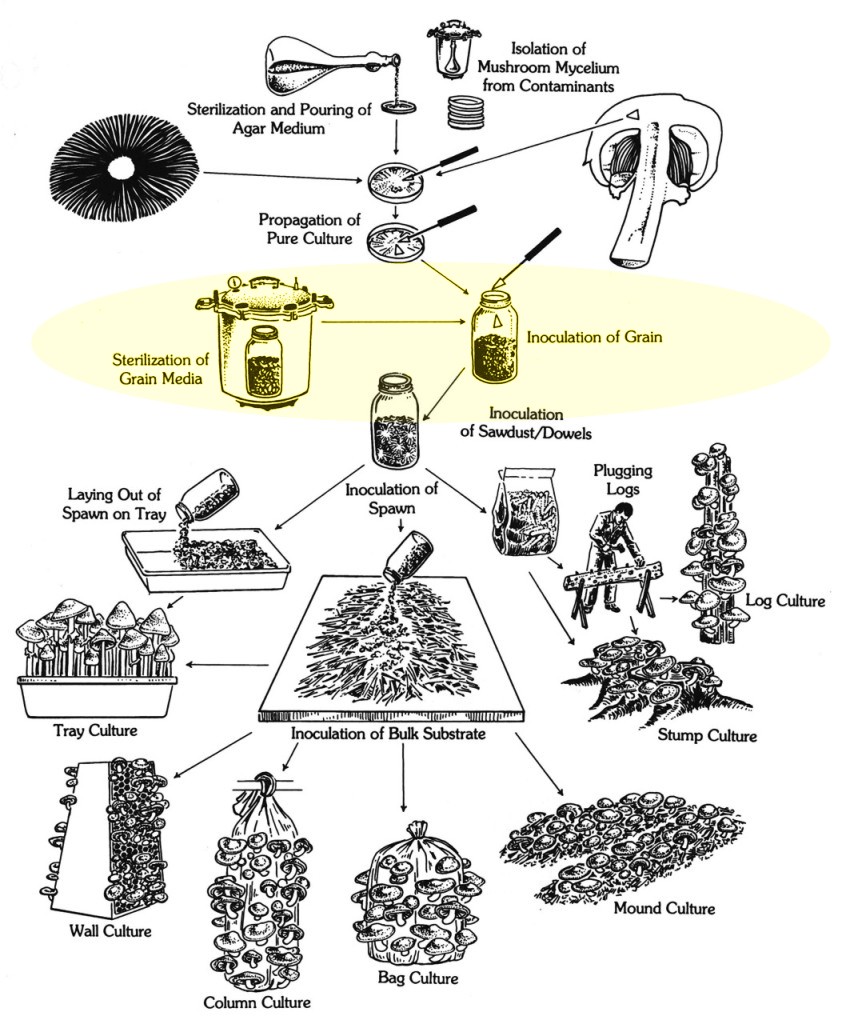 The interrelationships between cultivation methods.
(Diagram from “Growing Gourmet and Medicinal Mushrooms” by Paul Stamets)
The interrelationships between cultivation methods.
(Diagram from “Growing Gourmet and Medicinal Mushrooms” by Paul Stamets)Outdoor Mushroom Cultivation: If you want to grow mushrooms with minimal equipment in a low maintenance and less time intensive way, outdoor techniques are probably right for you. Outdoor techniques usually take longer to produce mushrooms when compared to indoor. I have a few outdoor projects going and they are essentially a “set it and forget it” kind of deal.
Indoor Mushroom Cultivation: Indoor cultivation is the way to go if you want to reliably propagate mushroom cultures and harvest mushrooms without being at the mercy of the seasonal weather. Most of my projects use indoor techniques because I enjoy working with cultures and seeing the progression of growth from spore to fruiting body. Whereas some people may have a number of potted plants in their room, I have an entire closet largely dedicated to mushroom cultivation. For me, it’s just plain fun!
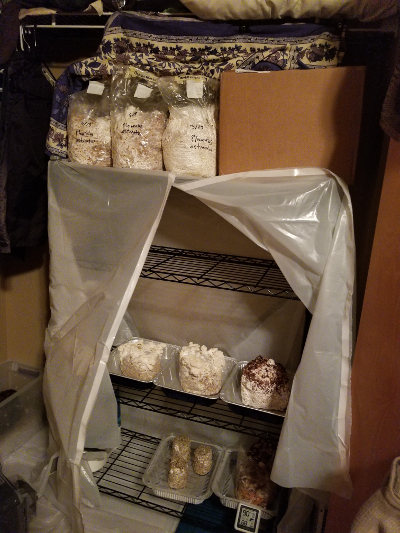 My simple closet grow set up. The plastic can be sealed shut to maintain humidity. Fruiting blocks are on the lower racks while bags that are still incubating are kept on the top rack. The incubating bags are normally covered to keep out sunlight during the day.
Here is a generalized PROS and CONS list to summarize the key differences:
Outdoor Mushroom Cultivation Pros and Cons:
Pros:
-less equipment needed
-less concern with contamination
-less day-to-day maintenance
-use of outdoor space instead of indoor living space
Cons:
-longer wait times for harvesting
-less control of growing parameters
Indoor Mushroom Cultivation Pros and Cons:
Pros:
-more control of growing parameters
-faster harvesting times
-culture control and strain isolation
Cons:
-high concern with contamination
-more equipment needed
-more day-to-day maintenance
-takes up indoor living space
The real question you should ask yourself, aside from what species of mushroom to grow is “why do I want to grow mushrooms?” What are your goals?
Are you just curious about the growing process or do you want to have a steady supply for you and your family throughout the year?
Are you considering growing mushrooms to sell at the local farmers market?
Whatever your answers are, I recommend starting small and slowly adding more to your project list as your knowledge level increases.
OUTDOOR MUSHROOM CULTIVATION METHODS
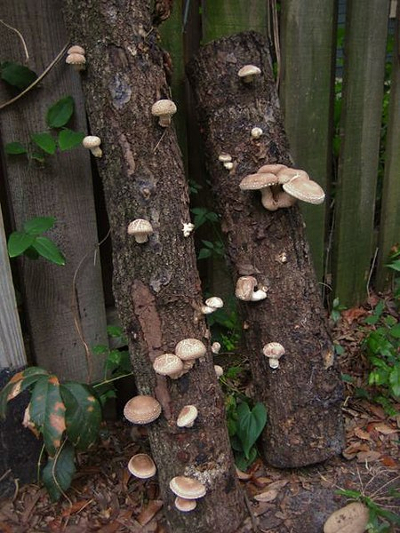 Shiitake logs
Inoculating logs is a great way to use trees that have blown over during a windstorm or that you’ve cut down for whatever reason. Mushroom harvest times are extremely variable depending on the size and type of wood, species of fungi chosen to grow, and environmental factors such as temperature, humidity, and rainfall.
You want to use logs with diameters and lengths that are manageable for you to move around. Suitable wood to use includes: alder, maple, oak, walnut, poplar, and several others depending on what species of mushroom you want to grow.
Logs can be used any time of year when taken from recently cut trees. Fresh, healthy trees have natural antifungal properties so you should wait after cutting fresh trees to allow some of those constituents to dissipate. Wait times will vary depending on what type of wood you use. Oak logs should rest for 3-4 weeks whereas red alder logs only need a week or so. You could inoculate without waiting but the goal here is to set up for success with the fungus you want to grow.
Using plug spawn, the tootsie roll method, and the wedge method are common techniques when inoculating logs.
*Note: “Spawn” is a term commonly used to describe a growing substrate that is colonized with mycelium. “Substrate”, also referred to as “medium”, is the material upon which a fungus is grown. For example, I can use oak and maple sawdust as my substrate if I want to grow Shiitake mushrooms. Once my sawdust is colonized with shiitake mycelium it is then considered spawn.
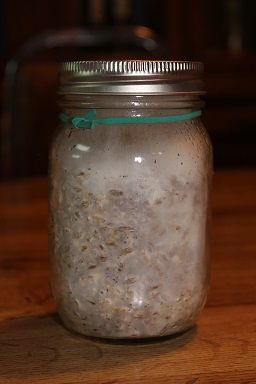 Example of spawn
Plug Spawn
Plug spawn usually comes in the form of inoculated wooden dowels that you hammer into holes in a predrilled log. There are also tools that can be used to take sawdust spawn and pack it into holes instead of using dowels and a hammer. While you’re at it, why not drill some holes in the stump of the tree you cut and put in some plugs?
Many people advocate for sealing the holes and log ends with wax to keep the log from drying out and prevent other fungus from easily entering it. Although this can be greatly beneficial, this step isn’t necessary as long as you place the logs somewhere that they won’t dry out. Use soy or beeswax if you decide to seal the log. Petroleum jelly can also be used in a pinch.
Logs should be put in shady areas and in excessively dry periods, the logs need to get watered from time to time. For example, I water the logs when it’s summer here in western Washington and we’ve received no rain for weeks on end.
Don’t forget to label your logs! It is easy to forget which log you inoculated with which species and when you did it.
Tootsie Roll and Wedge Method
These methods are best used with old mushroom blocks that have run their course and put out a few flushes of mushrooms. This is because these methods aren’t as reliable as using plug spawn and unless you have a ton of sawdust spawn around I think it’s best to save the good stuff for doing plugs.
When using the tootsie roll method you sandwich the spawn between two log ends and then attach the logs together.
The wedge method is similar in that you cut a wedge out of a log and sandwich spawn between the open space and the wedge. The wedge is normally secured with metal straps. Nails tend to split the wood.
Mushroom Beds
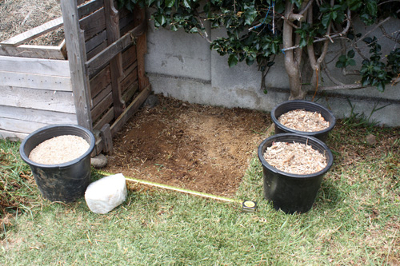 Making a mushroom bed
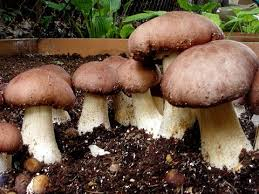 King Stropharia mushrooms fruiting
Using mushroom beds or “mounds” as some call them, is a simple way to grow mushrooms.
Oysters and King Stropharia are two common species that are grown using this method. A mix of straw, woods chips, or other substrate and spawn are all that go into mushroom beds.
Making the beds is simple and different ratios of growing substrate to spawn are recommended depending on who is giving the information. When talking about ratios there is no, one right answer. It just takes some thought as to how much growing substrate you have versus how much spawn. Just as the vigor of different mushroom mycelium can vary, so can your ratios.
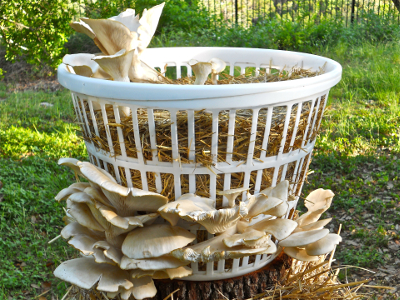 Oyster mushrooms fruiting from a straw mushroom bed made in a laundry basket.
Mushroom Slurry
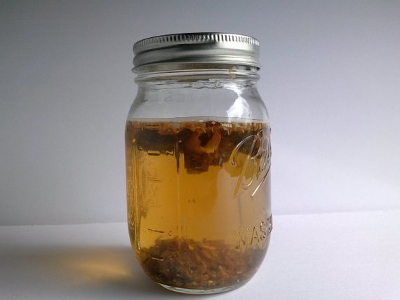 A slurry made from a couple of morel mushrooms ready to be broadcast.
This is a great method for broadcasting mushroom spores over an area in hopes that some will take and eventually grow mushrooms. This is a method commonly employed to grow mycorrhizal fungi like morels. Slurry recipes are variable depending on your source but all you really need are the mushrooms themselves or spawn to mix with water. These are mixed together in a blender or shaken vigorously then poured around the base of selected trees or other locations suitable to the mushroom's required habitat.
Reducing Contaminants in Your
Growing Substrate
The goal of fermentation, pasteurization, and sterilization is to kill off organisms that would potentially compete with the fungus you intend on introducing.
Pasteurization kills many organisms but you will always have some that survive the process. These survivors may or may not be beneficial. If not they will compete with your mycelium and potentially contaminate your projects.
Sterilization is a process that kills everything in the substrate. Pasteurization can be great for outdoor projects but for indoor mushroom cultivation, I recommend sterilizing.
Although preparing your substrate isn’t really necessary for your mushroom projects to work, it can make the difference between a large success and a complete failure due to contamination.
There are a number of different methods used by mushroom cultivators to prepare substrate and some make more sense and are easier than others. Pasteurizing, pressure cooking, and using cold fermentation are great ways to prep your substrate and are the methods I use in my projects.
Some methods use soaking baths of hydrogen peroxide or mixes of lime and other products to pasteurize large volumes of straw and wood chips. If you dive into some of these methods you’ll find varying recipes and procedures. If you are intrigued by these methods, go ahead and try them out.
Cold Fermentation Method
Cold fermentation is one of the easiest ways to prepare bulk substrate for outdoor mushroom cultivation. When straw or woodchips are submerged in water for about a week, an interesting thing happens. The aerobic bacteria that are present on the substrate die off and anaerobic bacteria begin to grow. When you take the substrate out of the water, the anaerobic bacteria die off when exposed to the air thus reducing the amount of contaminants that were originally present. This is one of the most low-tech methods available to cultivators.
Pasteurization
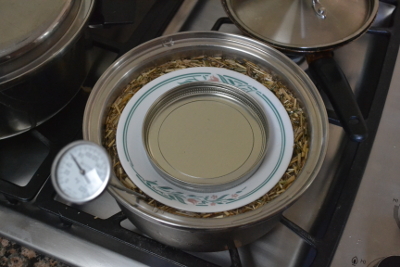 Straw being pasteurized in a small pot.
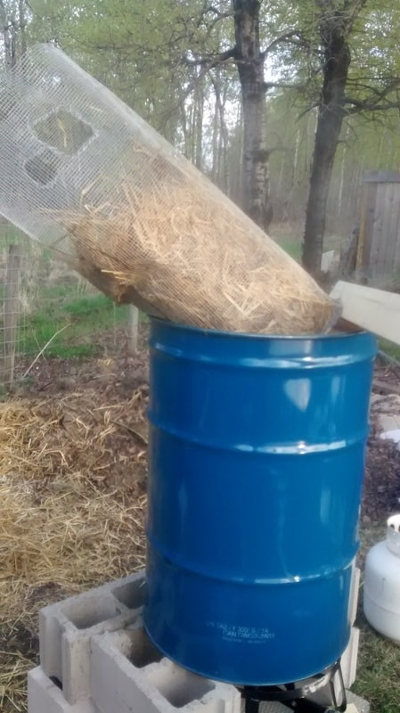 Straw being pasteurized in a 55 gallon metal drum.
Pasteurization is basically just boiling substrate for about an hour. Whereas small batches could be boiled in a large pot, bulk substrates could be boiled in 55 gallon metal drums.
Pressure Cooking
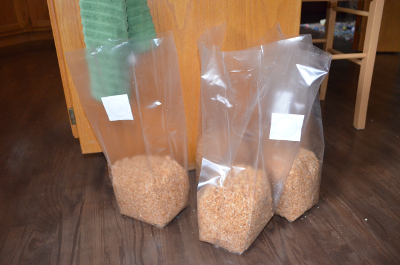 Moistened sawdust loaded into sterilizable bags. Sawdust has been moistened, not drenched prior to being put into bags.
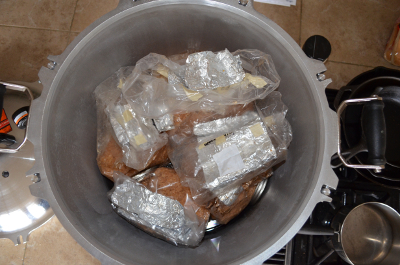 Mushroom bags loaded and ready to be pressure cooked. Notice the aluminum foil slips inserted in the bags and the jar lid rings used to keep the bags away from the sides of the cooker to allow steam to pass through.
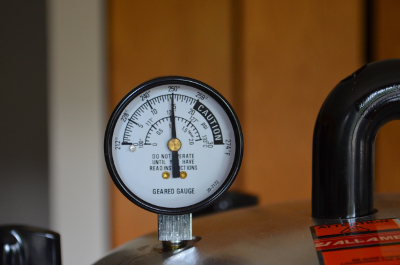 Pressure cooker gauge.
Pressure cooking is how you sterilize substrate. This method is what I use to prepare substrate for indoor mushroom cultivation projects. In a normal pot, water boils at around 212 degrees Fahrenheit. Some bacteria, mold, and fungal spores can survive these temperatures for long periods of time. Inside of a pressure cooker, water heats up and creates steam. This steam builds up the pressure which increases the boiling point of the water. This means that water boiling at 15psi is around 250 degrees Fahrenheit. This extra heat coupled with a long cooking time makes pressure cooking very effective at sterilization.
Pressure cooking is time intensive and quite a bit of work but when done right will result in extremely low instances of contamination. Contamination is a big deal when doing indoor cultivation.
The typical method used when pressure cooking is to cook the substrate at 15 psi for 2 hours.
When using bags you should slip in a long piece of aluminum foil and fold the bag closed accordion-style. This will make it so the bags don’t seal themselves up during the cooking process.
Not only is having a “clean” substrate helpful in mushroom cultivation, but also a clean workspace. This is a very important consideration for this next section.
Be More Prepared For Your Next Outdoor Adventure!

Don't leave home without knowing these six essential survival skills. Our free survival mini guide reveals the strategies of:
- Shelter & fire to prevent the number one cause of death
- Obtaining clean water to avoid life-threatening dehydration
- Common wild survival foods and other critical skills!

INDOOR MUSHROOM CULTIVATION METHODS
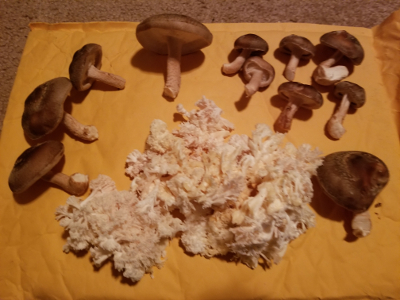 A nice harvest of shiitake and lion’s mane.
Before we begin, let’s sterilize and sanitize. Using stringent sanitation practices before and during the time you work on indoor mushroom cultivation projects will save you the heartache of doing a lot of work just to have all of them get contaminated. The extra time and effort will be well worth it when all of your projects take off without a hitch.
Even when you sterilize and sanitize there is a risk of contamination from airborne mold and fungal spores as you are working. These spores can come off your clothing, skin, hair, and be brought in by the slightest drafts. You can choose to work in the open but you’ll always run a much greater risk of contamination problems. Again, mushroom cultivation indoors takes time and energy, let’s not contaminate our work.
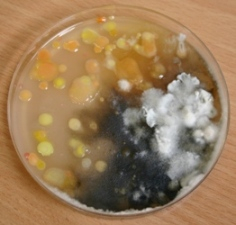 Mix of contaminants.
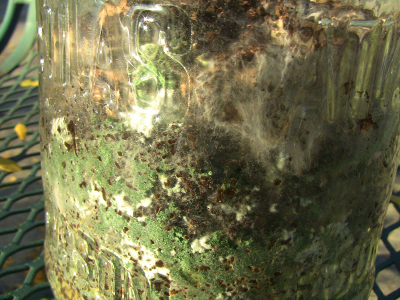 Trichoderma contamination
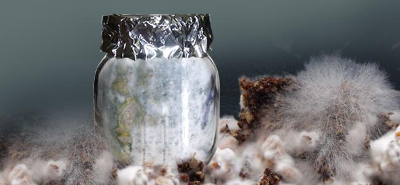 Cobweb contamination
Laminar Flow Hood
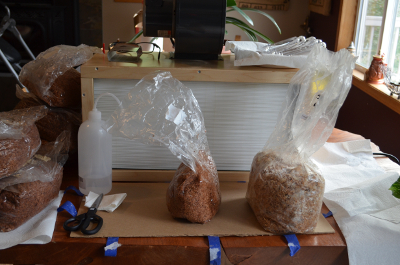
This is my indoor mushroom cultivation setup for any kind of inoculations or working with cultures.
The large filter box is called a laminar flow hood. A laminar flow hood sucks in air through a blower and forces it through a series of HEPA filters at a constant flow rate. This lets you have a roomy workspace while having a light, super clean breeze keeping any contaminates from landing on your projects.
You don’t need to worry about getting a laminar flow hood unless you decide to get really serious with your mushroom projects or want to work with cultures on a regular basis. Laminar flow hoods are pricey, even if you build one yourself.
Still Air Box
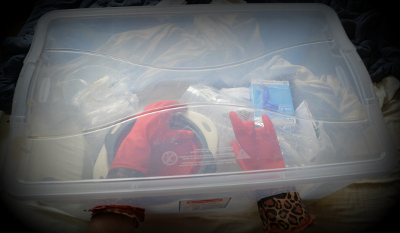
This is a “still air box”, which is essentially an isolation chamber. Using a still air box is a cheap and easy way to avoid getting contaminants from your surroundings on your mushroom cultivation projects. All you need is a clear tub with holes cut out for your arms to enter and long gloves. When thoroughly sanitized, the work you do in a still air box will have a low risk of contamination.
The problem you’ll find with still air boxes if you use them a lot is that they are cramped and cumbersome to work in at times. It can sometimes be difficult to bring in and take out equipment from the box without making a mess as well. Those issues aside, I think still air boxes are awesome if you are doing small projects.
I worked with my box for a long time before investing in a laminar flow hood but this was when I transitioned into working with agar and inoculating up to 15 bags at a time.
Trying to do all this in a still air box would’ve been a big headache.
In outdoor mushroom cultivation many different substrates are used, among most common include straw, logs, wood chips, sawdust, cardboard, manures, yard-waste, and compost.
In indoor mushroom cultivation the substrates commonly utilized are extremely variable depending on what is being grown. In addition to the outdoor substrates, indoor cultivators may use rye berries, bird seed, oats, barley, rice, insect pupae, agar mixes, and many others.
*Note: The term “TEK” is one that you will commonly come across when researching mushroom growing methods. TEK is just a simple way of saying “technique”.
Mushroom Blocks
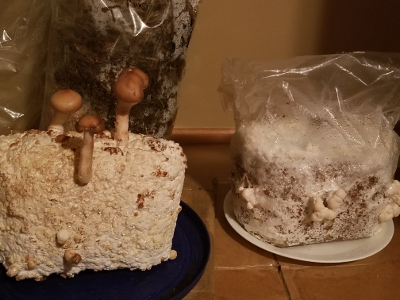 Fruiting shiitake and lion’s mane mushroom blocks.
Mushroom blocks are just like mushroom beds in that they are a mix of substrate and spawn that are left to colonize inside of a bag. Once fully colonized, mushrooms will grow straight out of the block.
Fresh, unopened mushroom blocks can also be used as spawn to inoculate more mushrooms bags.
I use bags to make shiitake, reishi, lion’s mane, and oyster mushroom blocks. Some of these I use to propagate mycelium so that I can keep new blocks in the rotation once the older ones have produced a few flushes or show signs of contamination. It is normal for older blocks to be susceptible to some contamination.
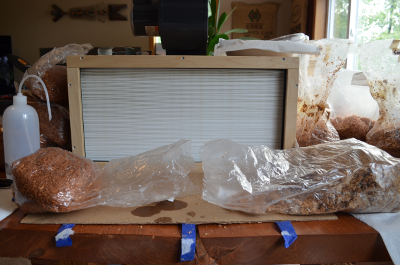 Sterilized substrate on the left is ready to be inoculated by the sawdust spawn on the right.
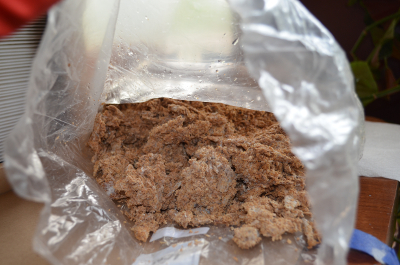 Sawdust spawn ready for distribution.
Some people use glass jars instead of bags. I have inoculated sterilized bird seed in jars to make grain spawn. This spawn breaks up nicely and is easier to distribute than sawdust during the propagation process. I once left a grain spawn jar of lion’s mane go for too long and had a baseball size mushroom grow straight out of the jar!
Fruiting Trays
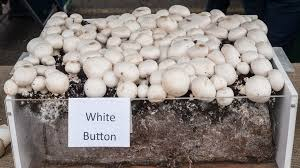
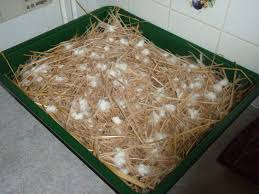
When using fruiting trays, fully colonized spawn is mixed in with a sterilized growing substrate inside of a pan or tray, such as an aluminum roasting pan large enough for a turkey. Once the spawn colonizes the new substrate the mushrooms will begin to emerge.
Spore Syringes
Inside of a spore syringe are mushroom spores suspended in a solution. Spore syringes are easier to work with than spawn and can be used to inoculate jars and bags. Although spore syringes are reliable, in my experience they aren’t quite as reliable as working with spawn.
For comparison, using a spore syringe to inoculate substrate is like planting a seed in soil, whereas using spawn is like transplanting an already established plant into a garden bed.
You can buy mushroom bags and jars with self-healing injection ports made specifically for those who use spore syringes. It’s easy enough to make your own self-healing injection port and it is a simple process to inoculate substrate using spore syringes.
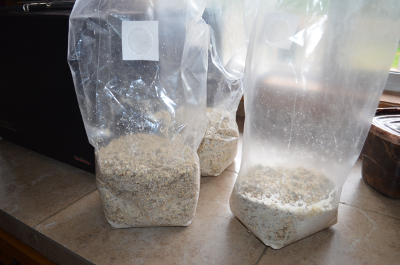
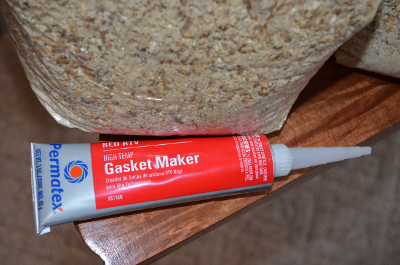 Use high temp gasket maker for the injection port.
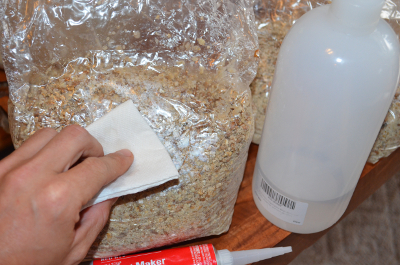 Start by wiping down the injection port site with isopropyl alcohol.
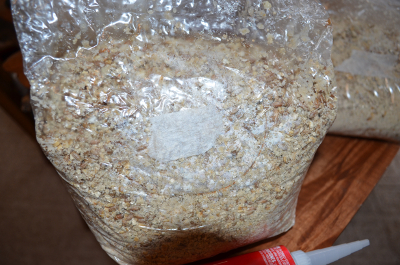 Place a piece of micropore tape over the injection site.
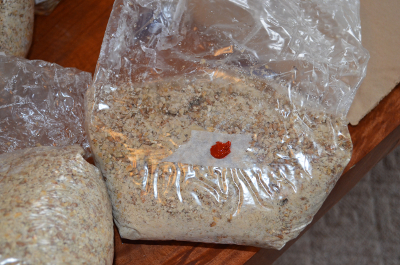 Squeeze out a dollop of gasket maker and set bag aside to let dry for about an hour before proceeding.
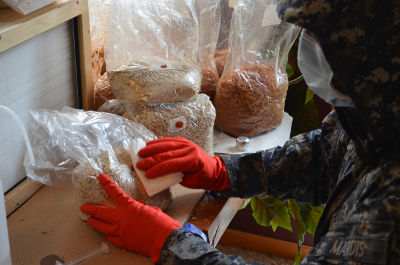 Wipe down the injection port with alcohol.
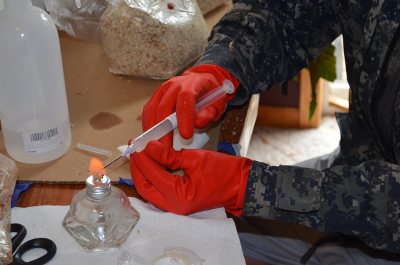 Flame sterilize the syringe until red hot. The liquid will cool it while injecting.
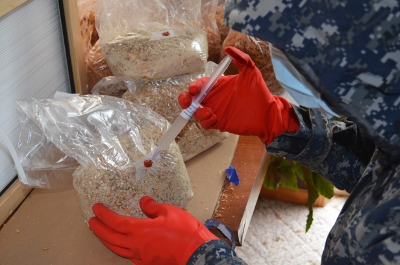 Inject a few cc’s into the bag, angling the needle towards the sidewall. This will allow you to see the mycelium growing if the injection was successful (or a whole lot of nothing if the injection failed).
Petri Dishes (culture plates) and Master Cultures
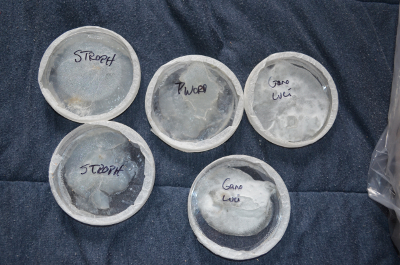 A few mushroom cultures ready for transfer.
Agar is a nutrient medium commonly used to grow out bacteria, molds, and fungal cultures in petri dishes for scientific research. Using petri dishes with agar, we can isolate specific fungal cultures for long term specimen storage and for easy propagation in the future. Dealing with cultures in this way is a finicky process that requires the most stringent sanitation practices to avoid contamination. Think of these petri dishes as a clean slate for the first mold or fungal spore to take hold of. The goal of cultivators is to have the intended fungus be the first and only organism to grow in the petri dish.
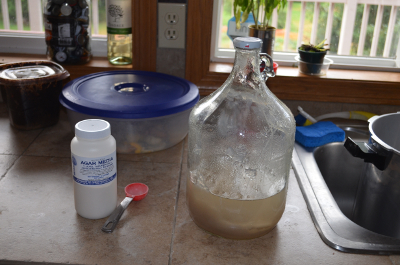 Agar media mixed in glass container ready to be pressure cooked at 15psi for 1 hour. The lid is screwed on loosely with a tiny hole punched in the middle to prevent dangerous pressure build up in the container. The tiny hole is covered with a piece of micropore tape, though a bit of cotton can be stuffed in it to act as a filter instead.
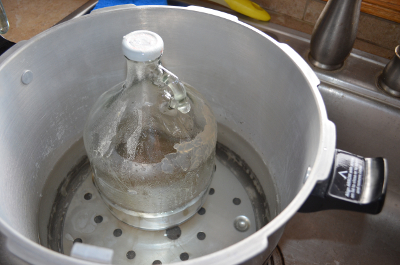 Agar medium staged for pressure cooking. Ensure there is plenty of water in the pressure cooker.
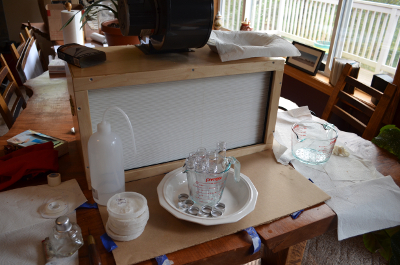 Culture plates and test tubes staged for making master cultures and ready to be filled with agar. Test tubes were sanitized in boiling water for about 10 minutes. Master cultures are essentially culture plates meant for long term culture storage. Think of them like a seed bank but for mushrooms instead of plants.
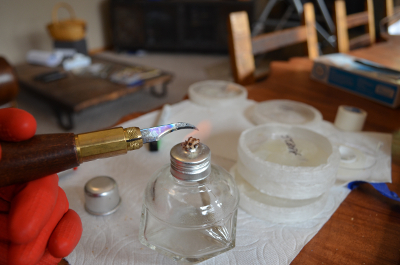 Always flame sterilize your inoculating tool before and in between working with cultures.
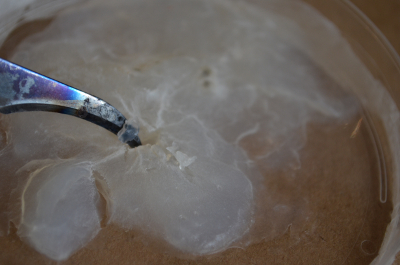 Take a very small section of culture to transfer over to your test tube or petri dish.
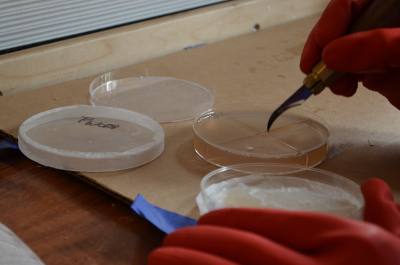 Quickly but gently transfer the culture and then replace the test tube or petri dish lid. You should only open the lids right before transferring cultures and then replace immediately after transfer. This minimizes opportunity for contamination.
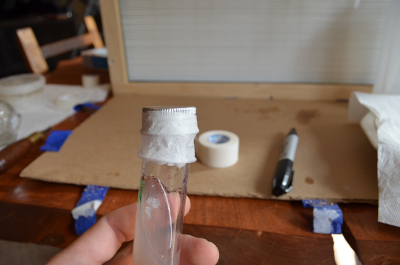 Loosely replace lids of test tube or petri dish and seal with micropore tape to allow air exchange.
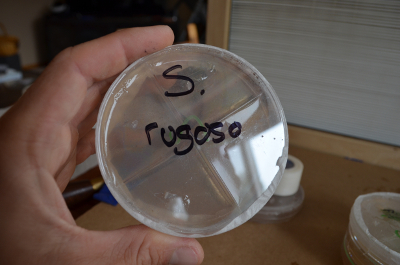 Always label your projects as soon as possible to avoid mix ups and confusion later.
Conclusion
Mushroom cultivation, much like gardening and permaculture, has so many aspects to it one could spend their entire life studying and growing and still have much more to learn. I enjoy mushroom cultivation because I can choose to be cavalier with some outdoor growing methods and then experiment like a scientist when I want to work with agar and cultures indoors.
Most importantly, have fun! I wish you much luck in all your mushroom growing ventures!
By the way, a big part of why we love homesteading & permaculture skills so much is because they are a natural extension of learning about wilderness survival (both fields are all about self-sufficiency and working with nature to satisfy needs). An understanding of survival not only helps you become a better permaculturist, it empowers you with life-saving outdoor skills to keep you safe when out in nature. Right now you can get a free copy of our mini survival guide here, where you'll discover six key strategies for outdoor emergencies, plus often-overlooked survival tips.
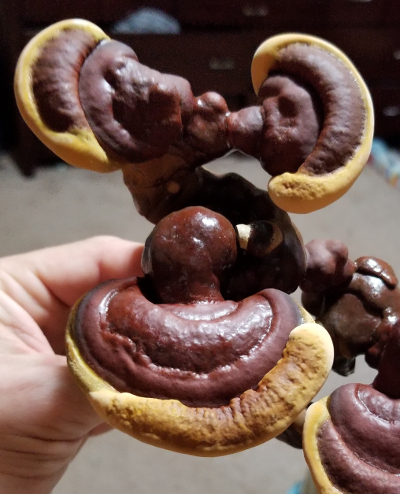 Home-grown Reishi mushroom!
Additional Resources on Mushroom Cultivation:
For more in-depth information on mushroom cultivation and growing specific species I recommend checking out The Mushroom Cultivator by Paul Stamets and J.S. Chilton.
Organic Mushroom Farming and Mycoremediation by Tradd Cotter is an awesome, inspirational resource for anyone trying to get started with mushroom cultivation.
Mushroom Cultivation References:
http://www.waldeneffect.org/blog/Propagating_a_shiitake_mushroom_log_for_free/
https://www.milkwood.net/2013/07/10/making-a-wood-chip-mushroom-garden/
https://www.milkwood.net/2015/11/23/mushroom-cultivation-making-grain-spawn/
https://radicalmycology.com/educational-tools/cultivation-info/cold-water-straw-fermentation/
Related Courses:
Wild Mushroom Identification Class
Permaculture Courses at Alderleaf

About the Author: Ben Mardis is an experienced educator that is passionate about permaculture and naturalist skills. He is a guest instructor at Alderleaf. Learn more about Ben Mardis.
Return from Mushroom Cultivation back to Permaculture Articles
Is The Essential Wilderness Survival Skills Course Right for You? Take the "Online Survival Training Readiness" Quiz
See for yourself if this eye-opening course is a good fit for you. It takes just a few minutes! Get your Survival Training Readiness Score Now!

Grow Your Outdoor Skills! Get monthly updates on new wilderness skills, upcoming courses, and special opportunities. Join the free Alderleaf eNews and as a welcome gift you'll get a copy of our Mini Survival Guide.

 The Six Keys to Survival: Get a free copy of our survival mini-guide and monthly tips!
Learn more