How to Make a Fire

Knowing how to make a fire is a quintessential survival skill. It provides invaluable heat and light and can enable water purification, cook food, warm a survival shelter, and repel insects and animals. Fire can even save a life by preventing or aiding in recovery from hypothermia.
Wet climates, such as the Pacific Northwest coast, provide challenging environments for fire skills. Mastering how to make a fire in wet climates gives you valuable tools to be able create fire anywhere. In all areas, particularly dry environments, it is essential to also learn and follow wildfire prevention.
There are a number of keys for success in learning how to make a fire including site selection, preparation, materials, design, mental attitude, safety & ethics, and of course practice!
Before starting a fire, make sure you are in an area where it is safe and ethical to do so—pay attention to burn bans or high fire risk that result from dry weather or strong winds. Ensure that fires are permitted and follow safety guidelines which are described later in this article.
How to Make a Fire - Preparing the Area:
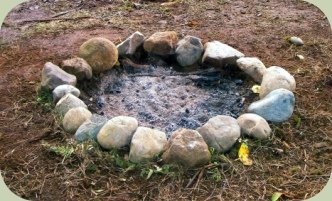
First you need to select a spot and prepare the area for your fire. At sites with prepared firepits make sure you choose one that is downwind and at least 15 feet from your tent and gear (so that embers don't float onto your tent or equipment, burning holes in them or worse, catching them on fire).
The spot should be void of grass, plants or debris and should have a ring of rocks surrounding it. The area surrounding the fire ring should also be free of debris. In drier areas, clear a 10-foot diameter around the fire site. Remove any burnables close by. Avoid overhead tree limbs as well as underground roots that could catch on fire.
In areas without pre-existing fire rings, dig a shallow pit and circle it with rocks. In these areas, fire safety is even more crucial.
How to Make a Fire - Gathering Materials:
You will need a fire starter, tinder, small kindling, large kindling, and fuelwood. Each is described below:
Fire Starters
You will need a method to light your fire. In a survival situation, make sure you have something you reliably know how to use such as a lighter or matches (waterproof ones help). If you are experienced, you can also use flint and steel, a magnifying glass, or a friction fire kit such as a bow drill or hand drill. You can read our evaluation of more fire starters.
Tinder
Tinder is highly-flammable material. It needs to catch fire quickly and hold the flame long enough to allow other materials to start burning. It’s a good idea to keep a protected dry tinder bundle in your survival kit or backpack.
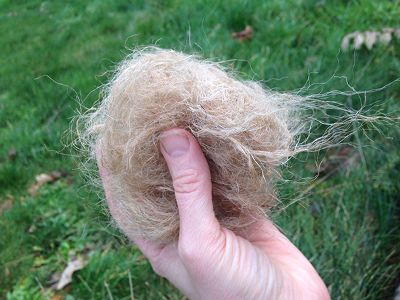
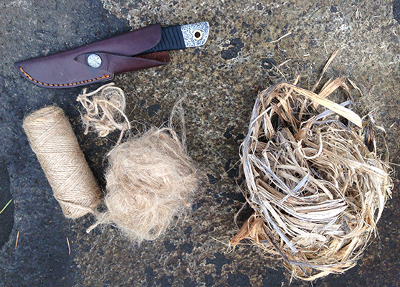
Homemade Tinder – This can be made from pieces of jute twine. Simply unravel short pieces and fluff them up to make an excellent tinder resource (pictured above). You can also use dryer lint, cotton balls that had been soaked in warmed petroleum jelly, or very fine wood shavings.
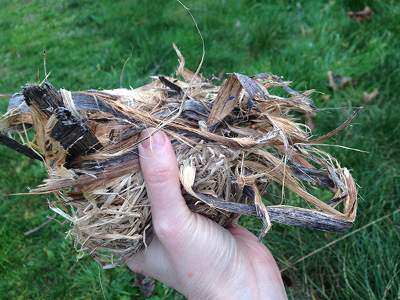
Wild-Harvested Tinder - You can use dry dead plant material; inner bark fibers; shredded dry leaves, grasses and moss; and/or very fine wood shavings. You can add conifer pitch (dried sap resin), and/or the seed fluff of cattails or fireweed, to extend your tinder bundle. If you find a downed black cottonwood or western red cedar tree or a tree losing its bark, the inner bark can make excellent tinder. Sometimes you can just peel it right off or you can scrape off the fibers of the inner bark using a knife or sharp stone, then fluff it up. A tinder bundle made from the inner bark of cedar is pictured above.
Kindling
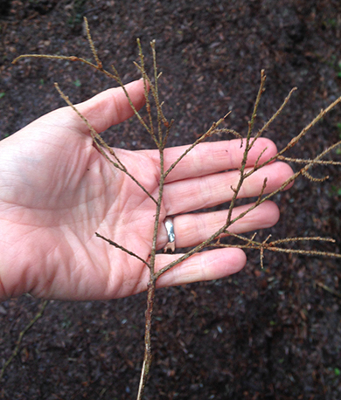
Small Kindling (also known as "thin and whispies", 1-2 millimeters thick) – When tinder ignites, it will need to catch onto something larger but still small. Very thin, dry brittle twigs will help the flame grow. The lower branches of evergreen conifer trees often have attached dead or dying branches that are very thin and brittle (only about 1-2 millimeters thick). Test them by breaking some off. If they snap, they will burn well. If they bend, they are too green to catch easily. Some species of hardwoods also have good small kindling. Collect a good pile of these.
Be More Prepared For Your Next Outdoor Adventure!

Don't leave without knowing these six essential survival skills. Our free survival mini guide reveals the strategies of:
- Shelter & fire to prevent the number one cause of death
- Obtaining clean water to avoid life-threatening dehydration
- Common wild survival foods and other critical skills!

Larger Kindling (branches 1/8-1/2” diameter and about a foot long) – Small kindling catches fire well but will burn out quickly. You also need thicker kindling. In dry areas you may be able to collect from the ground. In the wet Northwest, you may need to pull sticks from dead or dying trees or cut small pieces from dry logs using a small hatchet or fixed blade survival knife. Small pieces of cardboard and larger wood shavings can make good kindling. Igniting easily, kindling also sustains enough heat and flame to light the fuel materials.
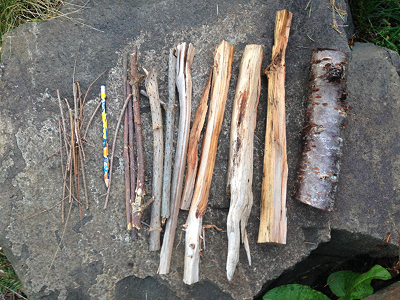
Fuelwood (1”-5” diameter) - Fuelwood will sustain the fire and keep it going. Smaller wood will burn quickly. Larger fuelwood will feed it. Again, wood that is aged, dry and brittle will burn best. Green wood will take a long time to catch fire and will smoke more. Hardwoods take longer to catch, but will burn longer than softer woods. Softwoods are better at starting fires and hardwoods are better at sustaining fires. To keep a fire going overnight, you will need a large amount of fuelwood on hand. It is also a good idea to have extra tinder and kindling in case your fire goes out.
Conifer Softwoods: Conifers (cone-bearing evergreens) have softer woods. They will burn quicker and hotter and will pop and crackle more as they have more resin. Examples of conifer softwoods include Douglas Fir, Pines, Cedars, Hemlocks, and Spruces.
Hardwoods: Hardwoods take longer to start burning but burn longer. Examples of hardwoods include Oaks, Maples, Madrone, Ashes, Beeches, Hickory, and Black Locust.
Even in wet conditions, you can still find materials dry enough for burning. Materials from live trees and plants don’t burn well and damage the landscape. The best materials will be found on standing dead wood from snags (dead or dying trees, but not ones that are punky and decayed). Downed trees can have good dead branches that are off the potentially wet ground. Wood should be brittle. Twigs and sticks should snap.
In wet conditions, protect your drier gathered materials from taking on more moisture from the wet ground and rain from above. This can be accomplished by placing materials inside a jacket or plastic bag or between tarps or inside a shelter while you are preparing for the fire.
How to Make a Fire - Design:
Collect a large pile of kindling and fuelwood and begin constructing your fire structure before you attempt to light it or start a friction fire coal. It would be extremely disappointing and potentially dangerous in a survival situation to start your fire before your materials are ready. If there is more than one person, work as a team--one person to collect and one to build the fire. You can also take turns tending the fire once started.
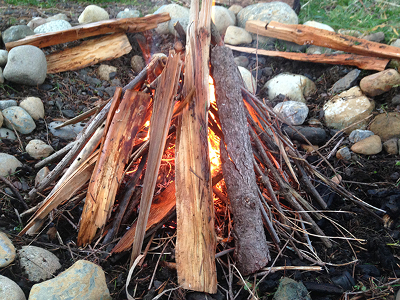
There are several designs for fires such as the log cabin, lean-to, and the cross. For survival fires, I like the fire tipi design. If built well, they catch quickly and provide a lot of heat and light. If the ground is wet, lay some kindling at the bottom of the fire pit to elevate your fire off the ground a bit. Start making a small mound of thin and whispies in the middle of the fire pit. Create a small opening in the side of the thin and whispy pile as a place for the tinder bundle once lit. Overlay your small kindling into a tipi shape around the mound. Make sure the tipi structure feels strong and balanced to avoid tipping over from weight or wind. Start adding a few pieces of larger kindling and small fuel around the tipi keeping the small opening accessible.
Now you can light your fire. If you are lighting by match or lighter, you can place the tinder bundle in the opening and light it while blocking the wind. If you are starting by friction fire, be close to the tipi and place the lit tinder bundle into the tipi opening once the tinder bundle is flaming.
Let the flame grow and feed the fire with some air by blowing on it. Fire needs air flow! Start building up the tipi with more kindling and fuel slowly, avoid placing materials right on top of the tipi or adding too much material too quickly—it may collapse or get smothered.
How to Make a Fire - Tending Your Fire:
Fire needs tending. Never leave a fire unattended since it could very quickly spread or die out. After you have a good fire going, keep wood close but not too close. You can dry out wetter wood around the rim, but monitor carefully so they don’t catch fire prematurely. Add larger pieces of dry wood as you go. If you are not alone, you can take turns tending the fire.
How to Make a Fire - Attitude:
This is rarely talked about but attitude can make all the difference for determining success or failure. Making a fire can be challenging in stressful conditions. Like many wilderness survival skills, fire making can be highly mental. Being grounded and relaxed with a clear mind will help you be successful. Challenging conditions can humble even an experienced survival expert. Find ways to warm your hands before starting since you may be cold. Cold hands lose dexterity and can lengthen the process. Practicing in different conditions will help you stay calm in the event of really needing fire for survival.
How to Make a Fire - Safety:
Every year wildfires are started by campfires in inappropriate locations, embers carried by wind, or campfires not put out completely. Fire safety is even more important than being able to start a fire. To extinguish a fire completely, allow wood to burn to ash completely. Douse it with water, dirt or sand (depending on if water is available) and drown all the embers, not just the red ones. Pour water until all hissing sounds stop. Stir ashes and embers with a shovel or fire tending stick (just make sure it doesn’t re-ignite). Scrape the sticks and logs to remove any embers. Stir until everything is cold to the touch. Never bury a fire. It could keep smoldering and catch roots on fire.
If the area has burn bans or high fire risks, choose alternative methods of heat and cooking. However, never cook with a stove in your tent! Carbon monoxide poisoning is a leading cause of death in the backcountry from stoves in tents.
Be highly conscientious when making fires in or around survival debris shelters. Without proper venting, there is potential of smoke inhalation and debris shelters can catch on fire!
Safety Tips:
-Place unused firewood upwind, away from the fire
-Keep a bucket of water and/or shovel nearby
-Roots can catch on fire underground. Don’t build fire on areas where there are roots, particularly in dry conditions. Even if your fire is out, it could still catch on fire underground.
-Keep your fire to a manageable size
-Make sure children and pets are supervised
-Never leave your campfire unattended
-Never cut live trees or branches from live trees
-Don’t burn dangerous things! (aerosol cans, pressurized containers, glass, aluminum cans)
-Put out fires thoroughly when leaving the site and pack out your waste!
How to Make a Fire - Practice Tips:
-First practice making a fire in a safe environment with easy conditions.
After you master that, challenge yourself by:
-Making a fire using only one match.
-Making a fire in five minutes.
-Making a fire in wet conditions.
-Learn how to start a fire using a bow drill.
With all of these elements in mind, go out and practice! Remember to keep practicing, and to make sure to put safety first. When you are done with your fire, always be sure to douse them with water and stir the water into the ash and coals to guarantee it is fully out.
Good luck and enjoy practicing how to make a fire!
By the way, if you enjoyed this article then you'll love our survival mini guide. You'll discover six key strategies to staying alive in the outdoors plus often-overlooked survival tips. We're currently giving away free copies here.
Additional Resources on How to Make a Fire:
Tips on How to Make a Fire at Wildwood Survival
Survival & Fire Making Classes at Alderleaf

About the Author: Heather Swift is an experienced naturalist, teacher, and ethnobotanist. She teaches about plants at Alderleaf. Learn more about Heather Swift.
Return from How to Make a Fire back to Wilderness Survival Articles
Is The Essential Wilderness Survival Skills Course Right for You? Take the "Online Survival Training Readiness" Quiz
See for yourself if this eye-opening course is a good fit for you. It takes just a few minutes! Get your Survival Training Readiness Score Now!
Grow Your Outdoor Skills! Get monthly updates on new wilderness skills, upcoming courses, and special opportunities. Join the free Alderleaf eNews and as a welcome gift you'll get a copy of our Mini Survival Guide.
 The Six Keys to Survival: Get a free copy of our survival mini-guide and monthly tips!
Learn more
Wait. Before you leave...
Don't forget your Survival Mini Guide.
It's free.
Be more prepared for your next outdoor adventure! Discover six essential survival skills. Join our newsletter and get a free copy of the guide as a welcome gift!
Your privacy is our top priority. We promise to keep your email safe!