Homemade Compost Bins
By Gabe Garms
Homemade compost bins turn your food and garden waste into wonderful compost. Below is information on the type of composting bin system we use in the central gardens at Alderleaf Wilderness College and how you can make one for your own garden space.
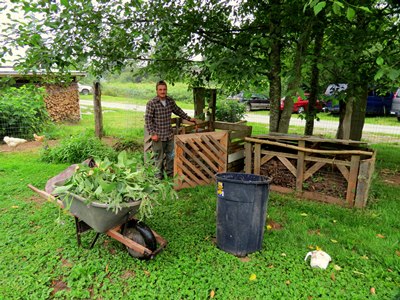
We are currently entering our sixth year here at the farm and as our gardens grow each year, so do our composting requirements. We handle composting differently depending on what we’re growing (annuals or perennials), but in this article I’d like to go into detail how we handle composting for our annual gardens since many of our perennials are part of a self-sustaining composting system. In other words, these are systems that require very little human intervention to maintain soil health). While we’ve always used a multi-bin composting approach with our homemade compost bins to generate compost for our annuals, we recently switched from 2 to 4 bins to accommodate our increased garden size. Here is a photo of our current 4 bin setup which consists of two separate 2 bin systems that were placed side-by-side.
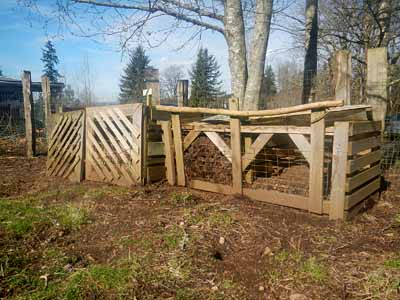
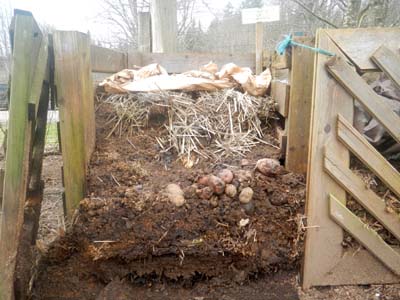
Let’s start by looking at the benefits of a homemade compost bin system and why it works best for us. First off, this is a relatively passive system, meaning the pile is only turned about once every month or two when the first bin becomes full. It can be turned more frequently if compost is needed quickly, but our passive approach works quite well. When the first bin is full, its contents are moved to the second bin (moving from left to right) and then it is left to sit until the first bin becomes full once again. Here is a photo of our first two bins.
You’ll find many resources discussing a 3 bin method in homemade compost bins, but the 4 bin works exactly the same, we just acquire more materials for composting than most. Another point to add regarding this system is that materials are never added to bins 2, 3 and 4 at any time. Think of a cake in the oven. Once it’s in, you let it bake and don’t add any new ingredients to it. The pile size will decrease as it moves from bin to bin so if you notice that bins 3 and 4 are smaller in size than the first 2, that’s why.
The bins themselves are made from scrap wood that are assembled to be roughly 3 feet high and 3 feet wide. This is important because for the center of the pile to be able to heat up to between 140-150 degrees Fahrenheit (the temperature required to kill weed seeds), the pile has to be at least these dimensions. Some choose to make their piles a bit larger but you generally shouldn’t make them any bigger than 5’X5’ since air only penetrates into the pile up to 24” from any one direction. If it’s any bigger than 4-5’ high or wide the oxygen required for decomposition cannot get to the center of the pile.
Be More Prepared For Your Next Outdoor Adventure!
Don't leave without knowing these six essential survival skills. Our free survival mini guide reveals the strategies of:
- Shelter & fire to prevent the number one cause of death
- Obtaining clean water to avoid life-threatening dehydration
- Common wild survival foods and other critical skills!

As you can see from the photo, we’ve used wood and some scrap metal fencing for our 4 walls with the front wall being removable so the material can easily be moved once the homemade compost bins becomes full.
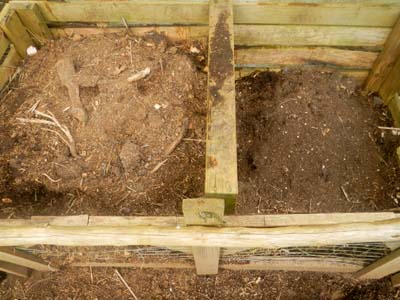
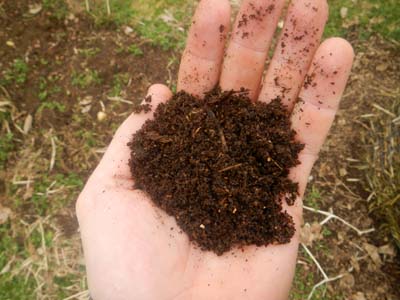
Now let’s move onto starting a new pile from scratch. It’s a good idea to start the pile in contact with the ground to allow soil organisms and bacteria easy access. One additional step that we take is to also add remnants from an existing pile to the new one so that the abundant soil life can quickly speed up the process. Here is a close-up picture of some finished compost that can be used as a starter.
Next
it’s time to add your carbon and nitrogen rich materials (browns
and greens) to your homemade compost bins. The reason that we're adding these two materials specifically is because organisms which
break down your organic matter require nitrogen to build their cell
structure and carbon for a source of energy. Ideally, they require
them in a ratio of about 25 parts carbon to every 1 part nitrogen.
You can still be successful composting at other ratios but they'll
more than likely slow down the speed of decomposition. Steady flowing
supplies of both need to be available to you at all times a year to
continuously be starting new piles every month or two. For our
nitrogen sources throughout the year, we use the multitude of chicken
manure, garden scraps, grass clippings, spent brewer’s grain from a
local brewery and leftover compostable food materials from our
students during class days.
Carbon sources, on the other hand, aren’t always as easy to acquire. There is always dead material available in the fall and winter months, but the spring and summer is where it can get tricky – everything is green! In the winter and fall, we use leaf litter from the campus' deciduous trees, moldy straw that has gone bad from our archery range targets, sawdust and brown paper (we get all kinds of paper in the form of deliveries). While we can continue to use the paper and sawdust in the warmer months the leaf litter is no longer available to us to put into the homemade compost bins.
To compensate, we leave a good majority of our tall, stalked plants standing during the winter. In most gardens, you’d remove your dead plants in the fall for aesthetics so it’s easy to get going again in the spring. But in a permaculture garden, we leave all of our dead stalks from our flowering plants standing and they in turn provide great overwintering habitat and food for the beneficial birds (who love the seeds) and insects (spiders, lady bugs, etc.) which eat our garden pests. If you remove them, the beneficial invertebrates will move elsewhere and the pests will have an easier time getting to your crops in the spring. Also, plants high in carbon are hard to find in the warmer months when the leaf litter has all decomposed, so when it comes time to start a new pile in your bin in the spring when everything is green instead of brown, you will wish you wouldn’t have removed all of your dead, standing stalks. Here is a photo of some of our standing stalks in late February.
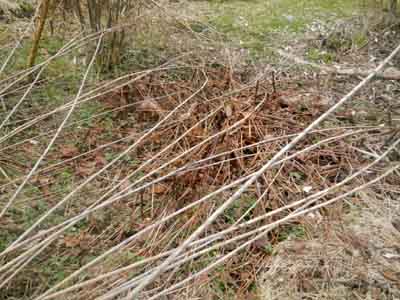
Here at Alderleaf, we grow four specific flowers which can also serve as great carbon sources for early spring piles, Maximilian sunflower, Douglas aster, chicory and Jerusalem artichoke. All four have either pithy or hollow centers which rot out quickly and leave their thick stalks hollowed out. These hollow centers provide a great source of airflow at the bottom of our pile within the homemade compost bins. Towards the end of May, the vines from our pea plants have died back and provide a great source of carbon during the summer months. In the end, it’s all about being creative and thinking ahead.
A couple of other tips to note, especially here in the Pacific Northwest, are to firstly keep your pile covered during the fall and winter when the rain season is at it’s peak. You want your pile to be damp like a wrung out sponge, not completely waterlogged. The second tip is to bury any scraps that are added to the pile so as not to attract rodents and other wildlife to your pile. With that in mind, good luck and happy composting!
Hopefully you’ve learned a few things about composting through how we do it here at Alderleaf and stay tuned for an upcoming article that will show you how to obtain compost in only two weeks!
By the way, a big part of why we love homesteading & permaculture skills so much is because they are a natural extension of learning about wilderness survival (both fields are all about self-sufficiency and working with nature to satisfy needs). An understanding of survival not only helps you become a better permaculturist, it empowers you with life-saving outdoor skills to keep you safe when out in nature. Right now you can get a free copy of our mini survival guide here, where you'll discover six key strategies for outdoor emergencies, plus often-overlooked survival tips.
More Resources on Homemade Compost Bins
Related Courses:
Permaculture Courses at Alderleaf Wilderness College

About the Author: Gabe Garms is passionate about permaculture, ethnobotany, birding, and wilderness survival. He wrote several articles while teaching at Alderleaf. Learn more about Gabe Garms.
Return from Homemade Compost Bins back to Permaculture Articles
Is The Essential Wilderness Survival Skills Course Right for You? Take the "Online Survival Training Readiness" Quiz
See for yourself if this eye-opening course is a good fit for you. It takes just a few minutes! Get your Survival Training Readiness Score Now!

Grow Your Outdoor Skills! Get monthly updates on new wilderness skills, upcoming courses, and special opportunities. Join the free Alderleaf eNews and as a welcome gift you'll get a copy of our Mini Survival Guide.

 The Six Keys to Survival: Get a free copy of our survival mini-guide and monthly tips!
Learn more