Deer Hide Tanning
How to Braintan a Hide

Taking the time to learn deer hide tanning brings with it many benefits. It not only reminds me of my ancestors, but allows me to experience the connection they had to the earth and animals. It also helps me to break away from the fast paced world I am a part of for a little while.
I always feel good that I can be part of a small, but growing group of people who demonstrate how to respect our resources by making use of as much of the animal as possible much like our ancestors did, by taking only what is needed. I feel that developing this type of mind set is very important as it is so easy in today’s world to forget where our resources come from. Most people don’t even make the connection.
We live in a time where our young are taught that they can just go to a store and get what they want or need without the realization of where it all comes from or how it effects our planet. It appears to be a never ending supply. This mind set is in desperate need of change, as our resources are not endless. And the only way to make it better is if we each do our part. So congratulations in taking this step & putting in the hard work.
Your finished hide will be a treasure and you will feel great pride in anything you make out of it. It takes time and hard work to accomplish, and really is a treasure. Once you learn deer hide tanning you can pass it on to your children, your nieces, nephews or grandchildren. You are preserving a skill that brings independence & restores a connection to our resources. I hope you enjoy the process as much as I do and that you find this article helpful.
Tools for Deer Hide Tanning
You really don’t need a lot of tools to be successful at deer hide tanning. You can even go as far as using one of the deer’s legs to make a scraper and flesher if you wanted to. But today we will use just a couple of tools that make the job a little easier.

I prefer to use an obsidian blade to flesh my hides, but you can use a knife to get the job done.
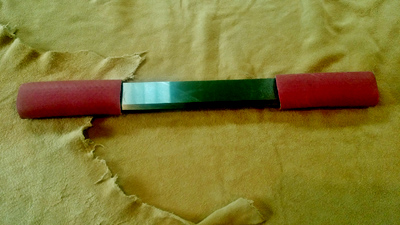
This is a blade used to scrape the hair and grain off the hide. Alternatives: knife, broken leg bone of a deer, or any somewhat sharp flat object. (You don’t want it to be too sharp, otherwise it can pierce the hide).
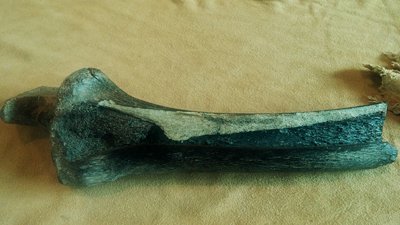
The prepared leg bone of a deer made into a hide scraper.

This is a cable used for softening the hide in the later stages of the deer hide tanning process.
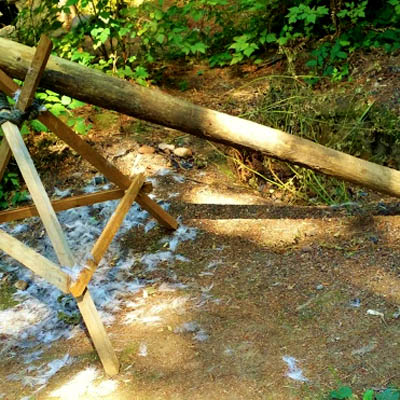
This is a log set up for fleshing the hide.
Deer Hide Tanning: Preparing the Hide
Fleshing - Once you get the hide off of the animal, you will want to flesh it. This is where you remove all the meat, fat and membrane. It’s easier to get the hair off when the hide is fresh - that way you don’t even need to soak it when you take care of it right away. But you can save this part for later without too much trouble.
Storing – Hunting season comes during the cold season, so you may want to store your hide until its warmer out. The braining portion actually goes quicker in the warmer months. That’s when I usually do it. If it’s a small hide though, like a squirrel or raccoon, you can easily do it in the house. Getting the hair off is easier when the hide if fresh, but is not necessary to do if you want to wait. Let’s talk about some storage options. Here are a few ways that work really well. You just have to determine what will work best for your space. I usually just scrape mine really well and then let it dry. This is the way my dad showed me how to do it. And I find some satisfaction in not having to go to the store for anything.
1- You can freeze it if you have room in your freezer- this takes the least amount of work.
2- You can scrape off all the flesh, fat and membrane and then let it dry out like a sheet and then store it somewhere. This takes a little bit of space. But works well.
3- You can salt it. You will need 5 – 7 pounds of a fine grain salt per hide. Apply your dry salt to a wet hide (the inside part where you removed the fat and flesh) rub the salt all the way to the edges and then fold in on itself. Let it dry for two days and then bag it. It will stay moist but won’t go bad.
Deer Hide Tanning: Working Your Hide
First, defrost your hide if you have chosen the freezer method, or rinse it off if you have used the salt method to preserve it. Then you will be ready to soak your hide.
Deer Hide Tanning: Soaking the Hide
You will need a container that will be large
enough to keep your hide submerged in water. A five gallon bucket works fine
for a smaller hide or an old garbage can. If you are lucky enough to
have access to a creek, you can place your hide in it, put a few rocks
on it to hold it down and then let it soak. The nice thing about using a
creek is that you don’t have to worry about having a container or
changing the water out.
Once your hide is in the water you will
need to stir it every day and if the water gets smelly you want to
change it out for fresh water. The amount of soaking time will vary,
depending on the thickness of your hide and the weather. In cold
weather I have had to soak a thick hide for up to a week. A thin hide
might only take three days in cold weather. However in warm
weather your hide will finish a lot quicker - more like two days for a thinner hide
and three days for a thicker one.
You need to make sure you stir your hide
every day and if it begins to smell bad you need to change the water so
it doesn’t end up rotting. You also want to make sure all parts are
submerged in the water. You can put a heavy rock on the hide if it
won’t stay down. Once the hair on your hide comes out fairly easy when
you tug on it and the overall appearance is swollen you are ready to
begin.
There is some controversy on the use of lye, and whether
or not it makes it easier or harder to soften up your buckskin. The lye
process is also a little involved, and I want to keep things fairly simple. It is also not necessary, so
I will skip further discussion of the use of lye for soaking. If you are really
interested in learning the lye process of deer hide tanning you can find some great
instructions in Matt Richard's book Deerskins Into Buckskins.
Okay, now
that your hide has soaked you can test a spot by tugging on the hair, it
should come out with a gentle tug. Some areas will be harder to get the
hair out and some will just seem to fall right off.
Deer Hide Tanning: Setting Up Your Fleshing Log
Place your hide over a log. You will be removing the hair and grain in the same direction the hair lays. If you are using a wall to rest your log on, you can place the neck flap between the log and the wall so that the hide doesn’t slip. If you are using a tripod, you can just lean up against the hide to keep it in place.

Deer Hide Tanning: Graining
Once you have your hide positioned with the neck at the top of your working area, use your scraper and remove a patch of hair about two to three inches wide and about four inches long. Now go over the same area again but this time you will push the scraper down into the hide and pushing your stroke away from yourself as hard and deep as you can. If your tool is not too sharp you won’t have to worry about cutting into the hide itself. The grain is actually pretty thick. If you are only getting a very thin layer off, that is probably just the epidermis layer and you need to go deeper. You should be able to see a little bare spot so to speak. What I mean is that there will be a noticeable indent where the grain is removed. This is the hardest part to learn through an article or book. But it is not impossible, just trial and error.
Now that you have a beginning point on your hide, continue working in small two inch patches, thoroughly removing all the grain. If you overlap your strokes you will be more thorough. One way you can tell if there is any grain left on is by its shiny surface. The inner part is whiter and buffed compared to the smooth shiny grain. Keep working until the entire hide is free of hair and grain. This takes a lot of hard work. The neck is the hardest part to grain because it is one of the thickest parts of the hide and the hair tends to grow in many directions. You don’t want to go against the grain because that only cuts the hair off and you are left with parts of the hair in the hide.
Once this is done flip your hide over and scrape that again, cleaning up any membrane that may have been missed.
Now its time to rinse your hide again.
Be More Prepared For Your Next Outdoor Adventure!

Don't leave without knowing these six essential survival skills. Our free survival mini guide reveals the strategies of:
- Shelter & fire to prevent the number one cause of death
- Obtaining clean water to avoid life-threatening dehydration
- Common wild survival foods and other critical skills!

Deer Hide Tanning: Braining
Every animal has enough brains to tan their own hide. But if you are not able to get the brains from your animal, you can purchase a pound of pig brain from your local butcher for a decent price.
Getting this part right is a big deal. The brain consists of fat and proteins that penetrate into the hide. Full brain penetration is key in having a final product that is nice and soft. You will most likely have to do this part two to three times.
Get a bucket or a large pot that will fit your hide. Fill that with one gallon of hot water. The water should be the temperature of a very hot bath, it should be just bearable for your hands to stay in. If it is too hot for your hands, it will melt your hide. Once your water is ready, place your brains in a bowl and add a little cold water and squish up the brains. Add to the hot water and continue squishing up the brain until it is kind of like a malted milkshake. Feel for bone shards and remove. You can add hot water or cold water to adjust the temperature before adding your hide. Put your hide in and squish it around with your hands. It’s important to fully allow the brain to penetrate. You can tell when this happens because your hide will be soft and loose. After about fifteen minutes you can pull the hide out and prepare for the wringing.

Here the brain solution is being prepared.
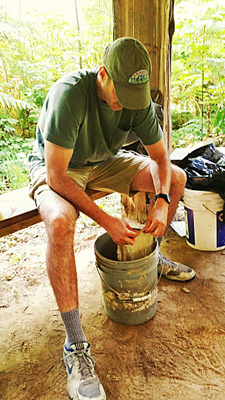
And here a hide is being worked into the solution.
Deer Hide Tanning: Wringing
The next step of deer hide tanning is wringing. You will need a horizontal pole two to three inches in diameter to drape your hide over for this part. You want it to be smooth and free of limbs so that you don’t damage your hide as you wring it out.

When you drape your hide you want to make sure that the neck end is the part hanging down. So the short part (in this photo) that is on the pole is the tail end. You only want the tail end to hang over about four to six inches. Once you have everything evened out you will take the neck end and pull it towards yourself and drape it over the pole, so it will be sitting on top of the tail end. So it should look like a loop.
Once you have that in place you want to begin folding it in toward the center. Make sure all the smaller parts are nice and neatly tucked in as you go along.
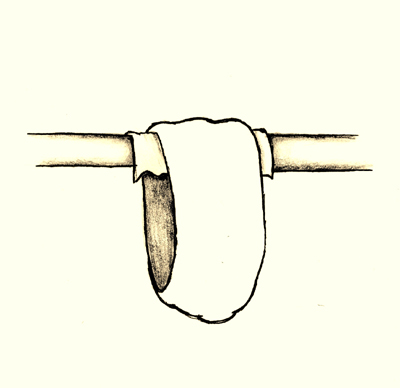
First, you loop the hide around the pole.
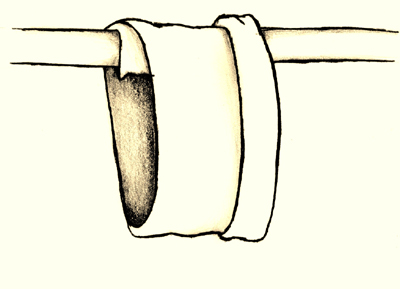
Now you begin folding it towards the center, starting on one side.

When you have folded both sides in evenly it should look like the the image above.

Now insert a small, sturdy stick to be used for twisting.

Using that stick, twist it tightly and wring out as much of the water as you can.
Now untwist and twist again in the opposite direction. Then untwist and rotate the hide a quarter turn and repeat the process until you have rotated your hide four times. Remove from pole and stretch your hide out. It should turn a white or off white color. If it looks blue or grey then you didn’t wring it out well enough. If you see ripples or it seems papery you need to put it in the brain solution again. It’s best to do the braining two to three times. Once in a while the first round is good enough.
You don’t want to save any of the liquid because it is full of all the hide glue.
Once you have finished the last braining and have wrung it all out, you can begin the softening.
Deer Hide Tanning: Softening

There are a few ways you can soften your hide, but for this article I am going to explain it with using a cable and pole. Having everything set up before you begin is really helpful. String up your cable. It should be attached to something on the top and the bottom so that you have a pretty taught line.
Wrap your hide around it, holding it in either hand nice and firmly and begin pulling back and forth. The cable is great for working the edges, which are the first part to dry out.

You can also make a softening pole. Or even use the edge of a porch railing. Anything that has an edge will work. The main thing to keep in mind here is that the hide needs to dry while in motion in order for it to remain soft. If it is not drying in motion then all the fibers will glue back together and become hard. You want to keep the pores open.
This part will take quite a while. Once you are happy with how soft it is you can begin the smoking process.
Deer Hide Tanning: Smoking Your Hide

The final step in deer hide tanning is smoking. Smoking your hide is what will keep the fibers from shrinking back to the original state when it becomes wet.
So the first thing you have to do is get your hide ready to smoke. You will need to sew it together like a sack so that all the smoke will stay inside. To do this you can fold your hide in half length-wise and stitch up the neck, down the side and attach to what we call a skirt. The skirt can be made from an old pair of blue jeans. If you have two hides, you can stitch those two together.
You will want to leave a couple of holes where you can tie your hide up.

If you don’t have a stove you can dig a hole in the ground and stake your skirt all the way around the hole. Just be sure that it is sealed off really well.
For the fire you will need some "punky" wood. This kind of wood smolders and creates a lot of smoke. If you go for a walk in the woods you should be able to find some. It is wood that has been decaying, it will be spongy and lightweight. First build a fire with regular wood so that you can build up a nice bed of coals. Then you can put your punky wood on top of the coals. Check every now and then to see if you need to add more punky wood. You want to have constant smoke. This should take a couple hours. Once one side is done, turn your hide inside out and repeat the process.
Once you have reached the desired shade of color take it down, un-stitch it, and have fun making something out of your new buckskin hide.
Congratulations, you are now done! For a really soft hide, you can repeat this entire process one or two more times.
By the way, if you enjoyed this article then you'll love our survival mini guide. You'll discover six key strategies to staying alive in the outdoors plus often-overlooked survival tips. We're currently giving away free copies here.
Additional Resources on Deer Hide Tanning:
Check out our Brain Tanning Course.
Here is another good article on deer hide tanning.
Learn all about primitive skills at our Wilderness Survival Courses.

About the Author: Georgieann Lilgreen grew up living off the land in Alaska. She has taught classes and written articles at Alderleaf. Learn more about Georgieann Lilgreen.
Return from Deer Hide Tanning back to Wilderness Survival Articles
Is The Essential Wilderness Survival Skills Course Right for You? Take the "Online Survival Training Readiness" Quiz
See for yourself if this eye-opening course is a good fit for you. It takes just a few minutes! Get your Survival Training Readiness Score Now!
Grow Your Outdoor Skills! Get monthly updates on new wilderness skills, upcoming courses, and special opportunities. Join the free Alderleaf eNews and as a welcome gift you'll get a copy of our Mini Survival Guide.
 The Six Keys to Survival: Get a free copy of our survival mini-guide and monthly tips!
Learn more
Wait. Before you leave...
Don't forget your Survival Mini Guide.
It's free.
Be more prepared for your next outdoor adventure! Discover six essential survival skills. Join our newsletter and get a free copy of the guide as a welcome gift!
Your privacy is our top priority. We promise to keep your email safe!