How to Make Maple Syrup
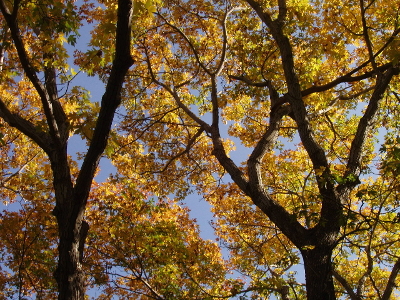
How to Make Maple Syrup from Bigleaf Maple Trees
Nothing seems to capture the essence of country living quite like pure maple syrup. The taste is evocative of serene winter mornings in the warmth of a cabin.
The familiar amber liquid we buy in the store is made from the sap of sugar maples found in the eastern woodlands of North America. We don’t have sugar maple here in the rain-forests of the Pacific Northwest, but our native bigleaf maple can be tapped for a syrup that is of perhaps even greater quality. The taste is, if possible, even more delicate and refined. Add to that the pleasure of self-sufficiency and you have a fine recipe.
Some folks find the prospect daunting, but with a little direction and a few materials, the process of how to make maple syrup is fun and productive, and enlivens the short, wet days of winter.
How to Make Maple Syrup: Identifying Bigleaf Maple Trees
Before you do anything you need to be able to identify the bigleaf maple tree. If you are unfamiliar with bigleaf maple I suggest supplementing this description with local field guides.
Acer macrophyllum. Large tree, often with multiple, branching trunks. Young trees with smooth reddish brown to gray bark; older trees with furrowed grayish bark, often with heavy load of moss and ferns. Large, deciduous, five-lobed leaves. Leaf stalks exude a milky sap when cut. Opposite branches, leaves, and buds. Flowers small, greenish-yellow, numerous, on hanging raceme. Seeds, referred to as samaras, paired with 1-2.5 in. wings.
Identification is relatively simple once you get an eye for these trees. Because you will need to be able to identify them with leaves down, pay attention to subtle identification cues. Branching pattern, buds, growth structure, and bark can all be used in conjunction. Look for fallen leaves and samaras to quickly identify productive groves.
The season for tapping bigleaf maple runs from November through February. Peak season is dependent on weather and varies somewhat from year to year. Sap will run inconsistently across individual trees and locations throughout the course of the season. I generally start drilling test holes in mid-November and set my taps when I am getting good sap flow.
Bigleaf maple is a tough tree and tapping has little effect on its overall health.
How to Make Maple Syrup: Materials
Learning how to make maple syrup (or sugaring for short) is a materials-intensive project and you’ll need to get a few things in order before you can start. Some supplies will most likely need to be purchased, but with a little creativity, many of the materials can be gathered for free or fabricated.
The initial investment is also softened when you consider it will be used to make what would be an otherwise expensive product. If I can avoid paying for materials, I do. For me, half the fun of home-scale syrup production is figuring out how to do it on a budget. If you are going to invest any significant amount of money in supplies I would just recommend making sure they are built to last and that you are committed to using them year after year.
Here’s an overview of some of the materials you can expect to need for learning how to make maple syrup:
Drill
Hatchet
Spiles
Collection Containers
Storage Containers
Cinder Blocks
Evaporator Pans
Wood
Skimmer
Ladle
Large Pot
Finishing Stove
Thermometer
Filter
Glass Jars
Drill: You’ll need a drill for tapping the trees. You can either use an electric drill or pick up an old-timey brace drill, which is what I use. These are little more cumbersome and time consuming, but they don’t need to be charged. Bit size will vary depending on the size of your spiles. I usually use a 7/16 bit.
Hatchet: Useful for clearing brush and pounding in spiles. You can also just carry a hammer, but if you have to carry something, a small axe or hatchet is more utilitarian in the woods.
Spiles: These are the taps that you hammer into the tree. There are a few different sizes and styles. I stick with the classic 7/16 in.ch stainless steel spout variety. Aluminum is also available, but the stainless steel is higher quality. You can also buy spiles specially made to interface with a bag or tubing collection system. Spiles can be improvised out of metal or wood, but if you do this I would try to ensure your spiles are a consistent size and you have an efficient method of fabricating them; spiles are relatively affordable and can be ordered in quantity online.
Collection Containers: These are the containers you hang off the spile to collect the sap as it flows from the tree. Traditionally folks use an aluminum bucket, but there are a couple problems with that method. The bucket has to be covered to prevent it from filling up with rain and debris, and has to be well sealed to prevent insects from getting to the sap. Buckets made specifically for this purpose can be ordered online, but they are expensive - about $35 a piece.
My preference is to fabricate my own buckets out of plastic containers. My favorite are gallon milk jugs, especially the square Kirkland brand milk jugs. These are convenient because they’re lightweight, easy to seal, pour well, and are usually free. I clean the containers out and cut a small hole near the top which fits directly over the spile on the tree.
Two-liter bottles can work as well, but need to be checked more often when sap is running heavily. The major drawback to gleaned plastic containers is they will hold flavor if not cleaned out immediately.
If you want to get more serious you can order special bags for sap collection, but this can also potentially get expensive. Another option is plastic tubing and spiles which can connect multiple trees and run sap into larger containers. This is probably the most efficient way to tap trees and the materials are relatively cheap. I would recommend getting a couple seasons under your belt before setting up a big tubing system to avoid getting ahead of yourself while learning how to make maple syrup.
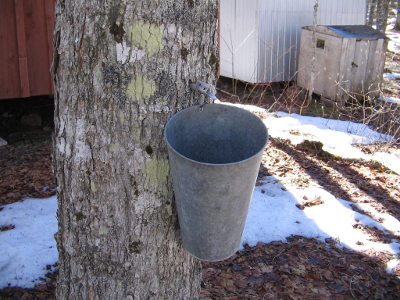 Old-timey bucket - lets bugs and rain in unless covered
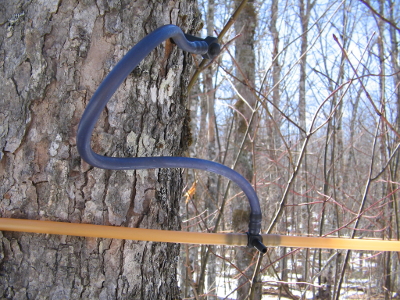 tubing system
Transportation/Storage Containers: You’ll need some kind of larger containers to transport and store your sap in between sugaring sessions. Depending on how many taps you are running and how much sap you are collecting, you will probably want to boil it down every few days.
Make sure you have enough storage containers to accommodate at least a gallon of sap per day for each tree you have tapped. You probably won’t collect quite that much, but when the sap is flowing well it’s possible, and you’ll want to be prepared. I prefer 4-7 gallon containers because they’re easy to work with. I usually re-purpose 5 gallon canola oil jugs. These are great because they are easy to store and carry.
Food grade 5 gallon buckets are also a good choice. I can usually call a few friends working in the food industry and manage to get my hands on some jugs or buckets for free. Checking Craigslist is generally fruitful as well. If need be, you can buy new containers. Water jugs work fine, otherwise maple syrup equipment suppliers sell 5 gallon storage jugs for around $15. Bear in mind you’ll probably need at least 5-10 of these, so it’s easy to spend a few hundred dollars if you are buying expensive containers.
Evaporator Pans: We’ll get more into evaporator construction later, but for now I’ll mention that you’ll want a couple pans to boil your syrup down. This is one thing you will probably have to pay for. Wide, flat pans with a lot of surface area allow water to evaporate more efficiently and make the sugaring process much smoother. You can get by with just one, but two is my preference.
You can also use a pot, but it will take longer than you can possibly imagine to process any significant quantity of sap, and you’ll have to use much more fuel. Used steam table pans, referred to variously as restaurant, hotel, or buffet pans, work well. You can find these at thrift shops, garage sales, or online. If you can’t find anything used, you can buy them online or at a restaurant supply store. Somewhere in the range of 12x20 inches is a fine size, but I’ll take the biggest pans I can get my hands on. 6-8 inches deep is sufficient. Alternatively, you could have somebody weld a custom pan.
Cinder Blocks: For building your evaporator. You don’t necessarily need to use cinder blocks, but they are a good starting point. I have often found cinder blocks for free, either from friends and family or on Craigslist. A 55 gallon metal drum and a stovepipe is about as good as it gets, but we’ll dive into evaporator construction later on.
Firewood: You’ll need firewood to run your evaporator and boil your sap down. The amount you need will vary depending on the volume of sap you intend to process. About ¼ cord would be a good starting point. It’s better to have too much than not enough. Well-seasoned hardwood is preferable, but whatever you have available will work. Douglas fir, bigleaf maple, and alder are all good choices in our region.
I recommend getting your wood in order well ahead of time if possible so that even if the wood is of inferior quality, at least it will be dry. You don’t want to be scrambling for wood at the last minute. You can either buy wood or cut your own. If you want to buy wood, there are usually plenty of folks selling firewood on Craigslist. Shop around a bit to get the best price and quality.
If you want to cut your own firewood you can get a permit from either the State Department of Natural Resources or the US Forest Service. Permits will run you about $20. On National Forest land you can cut up to 6 cords a year. If you take this route you’ll want to plan ahead. It’s best to go out in spring or early summer; you will have the best selection of fallen trees near forest service roads and your wood will have time to season.
Finishing Stove: Towards the end of the sugaring process things start to happen a little bit too quickly for my liking on the wood fired evaporator. I prefer to finish the process on an outdoor propane stove.
Thermometer: Used to gauge sugar content when finishing syrup. You need something that can withstand high temperatures and is accurate to a degree. I prefer digital food thermometers. Alternatively you could pick up a fancy contraption called a refractometer for between $50 and $500. Refractometers are an expedient method of measuring sugar content.
Filter: Syrup needs to be filtered before you pour it into jars. Special filters can be purchased at syrup supply shops online. Other options include dairy filters from a farm supply shop or deep fryer oil filters from a restaurant supply shop. If you are only making a small amount you can also just use coffee filters.
Glass Jars: Pretty straight forward. You need somewhere to store your syrup. I prefer glass because the syrup is hot when I pour it in jars. I just use regular pint jars, but you can also use fancy syrup bottles. Sugaring supply companies carry a diversity of bottles, jugs, and tins.
Before acquiring your materials, take some time to think about how serious you want to get. Consider how much time and energy you have to devote to learning how to make maple syrup and how much syrup you’d like to produce.
It’s easy to get in over your head. For a first season I would recommend tapping about 5-10 trees. This is enough to get a decent amount of syrup and a good grasp on logistics without getting overwhelmed. Take it slow your first season and once you have the process figured out you can expand as much as you like.
How to Make Maple Syrup: The Process
We’ll break the process down in to four parts: tapping, collection and storage, evaporation, and finishing.
I’d also like to mention site selection. There are some relatively labor and time intensive elements in maple syrup production. You want your operation set up somewhere you are able to routinely check your sap buckets and where hauling sap isn’t going to be too difficult.
Your primary concern should be economy. Avoid setting up in a location that is too difficult to access or too far from home. Ideally you will be tapping trees close to trails and roads to facilitate transportation of sap. You don’t want to bushwhack your sap out of the woods every day if you don’t have to, especially considering you could be carrying numerous gallons.
If you have trees on your property, great! If you don’t have any bigleaf maple on your property, or you don’t own property at all though, don’t be entirely discouraged. Developing good relationships with private property owners can be surprisingly fruitful. If you approach friends, family, or neighbors tactfully you can often get permission to tap a few trees, especially if you are willing to share some of your harvest.
Another option is tapping trees on public land. Check with local land management agencies for regulations or permitting.
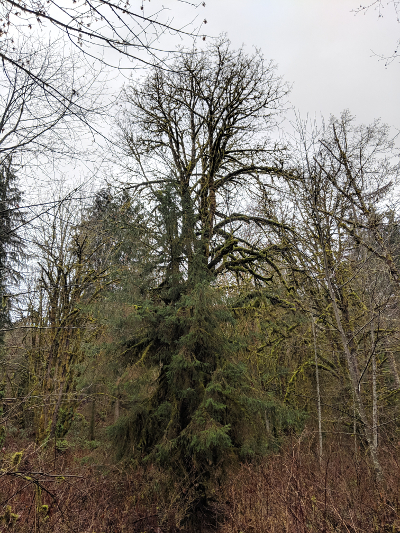 Quality Sugarbush in Winter
(moss-covered maples behind a hemlock sapling)
Quality Sugarbush in Winter
(moss-covered maples behind a hemlock sapling)Tapping:
It is difficult to quantify what will make any given tree a good producer. Much of the colloquial knowledge on the subject has been extrapolated from the practices of our counterparts in the east, and may or may not be applicable to bigleaf maple.
For example, traditional wisdom suggests that trees with a southern exposure will produce better, but I haven’t found this to be the case. All the potential variables affecting sap production are beyond the scope of this article. Some trees produce copious amounts of sap; some trees produce little, if any. Good trees often produce well year after year. I select for ease of access above any other variable; in other words, I tap the trees I can get to.
I look for trees that are 6 to 24 inches in diameter. No need to be exact. Very large or very small trees usually don’t produce as well, but experiment with what you have. On branching trees, multiple stems can be tapped, but I generally only put one spile in any individual stem.
Trees can be tapped at a convenient height; I’ll place mine slightly higher than then the level of my waist, which facilitates easy drilling and sap collection. The sap is flowing through the cambium just under the outer bark, so taps don’t need to be drilled much deeper than is required for the spile to stay put, usually about 2-4 inches.
Drill your holes at a slight upward angle to sap will flow out of the spile more easily. After drilling your hole, tap the spile into place with your hatchet and, if you are using a bucket collection system, hang your sap bucket off the spile.
If you are using tubing, simply connect a length of tubing to your spile and run it to a container on the ground. If you are tapping multiple stems in close proximity to each other you can buy connector pieces that run multiple tubes together into a single line which can be attached to a larger storage container. If you want to process a lot of sap, this is the way to go. Another benefit of this type of plumbing system is it is easy to exclude insects.
You will generally be able to tell if sap is flowing almost immediately when you drill into a tree. The saw dust from your drill will come out wet and foamy and sap will start leaking down the tree. I like to drill a shallow test hole and if there is no sap flowing I usually move on to another tree. It’s easy to waste your time with unproductive wells. Not all trees run simultaneously.
Taps will need to be periodically re-drilled as they heal. My preference is to drill a new hole several inches away from the first and move the spile.
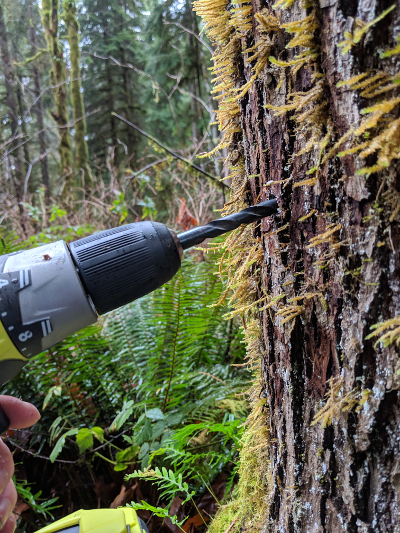 Tap at a slight upward angle
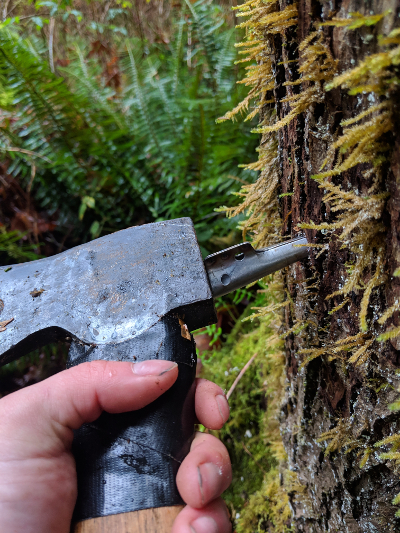 Driving in the spile
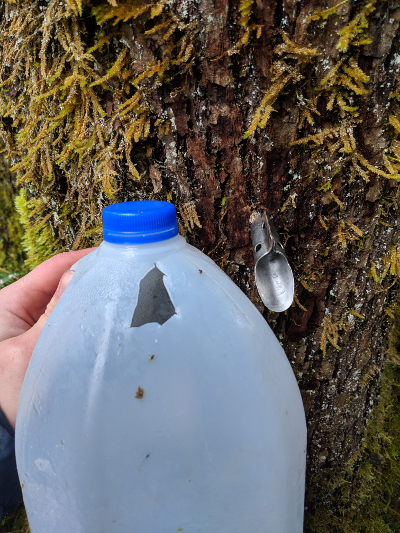 My preferred storage container. Hole cut just large enough to accommodate spile.
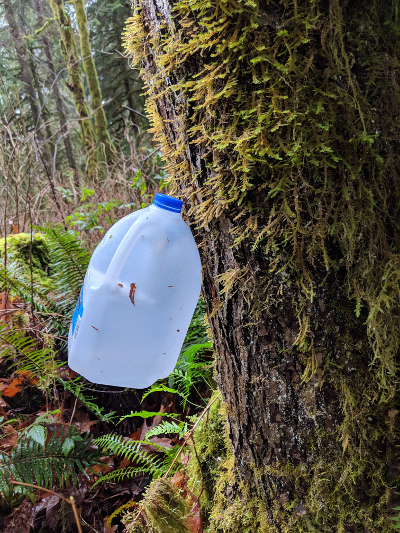 Jug hanging on tree
Collection and Storage:
Sap should be collected every day, and collection containers should be large enough to accommodate a full 24 hours worth of sap. Gallon sized containers generally work well, but during heavy runs will sometimes overflow. Sap contains sugar, bacteria, and yeast and will eventually spoil if not collected and processed.
Particularly during warm spells, insects will be attracted to your sap if containers are left out or aren’t well sealed. Overflowing containers especially can attract large amounts of insects. I suspect that insects can accelerate sap spoilage, potentially through bacteria exchange. That being said a few bugs is no big deal, but you’ll want to exclude them if possible.
If you’re using buckets you can just pour them directly into your storage/transportation containers. I like to run my sap through a cheesecloth as I pour it from my buckets into my storage containers to filter out any bugs or debris.
Tubing systems will run directly into larger storage containers, and you can just swap these out for empty containers when they are full. During periods of light flow, make sure you’re collecting and processing the sap in these larger containers, even if they don’t fill up.
Keep in mind that hauling even 10 gallons of sap out of the woods is pretty taxing if you have placed your taps too far away from trails or roads. As you expand operations and the volume of sap you’re processing increases you’ll want to streamline your collection system to avoid unnecessary workload.
In cool weather sap can be stored outside for several days, but needs to be boiled down every few days to prevent spoilage. Sap can also be stored frozen if you are unable to process it right away. If you want to stretch out time between sugaring sessions a couple more days, you can pasteurize your sap by bringing it to a boil. This will kill bacteria in the sap and stave off spoilage, but it’s not magic and will only buy you a few extra days.
Be More Prepared For Your Next Outdoor Adventure!

Don't leave home without knowing these six essential survival skills. Our free survival mini guide reveals the strategies of:
- Shelter & fire to prevent the number one cause of death
- Obtaining clean water to avoid life-threatening dehydration
- Common wild survival foods and other critical skills!

Evaporation:
Once you have your sap collected, it’s time to process it. Conceptually, the process is simple; you boil the sap to concentrate it. Sap is syrup when it reaches 66-67% sugar.
If you’re only boiling down a small amount of sap the whole process can happen on your stove top, but even this can be time consuming. A pot on your stove doesn’t typically boil down as fast as you’d like, and if you don’t have a good intake above your stove, it only takes a few gallons to steam your house up pretty dramatically.
For anything more than a few gallons of sap you’ll want an outdoor evaporator. Evaporators can be ordered online, but even the cheapest one will probably run you $1,200. For home-scale production the benefits of expensive evaporators are negligible, and you can build your own for next to nothing.
Evaporator construction is fairly simple and one of my favorite parts of how to make maple syrup. Basically, your goal is to create a woodstove that allows you to concentrate as much heat as possible on the bottom of your pans; this can be as simple or elaborate as you like based on your needs and what materials you have available. Generally speaking, as the number of taps you run increases, so should the care you take in the construction of your evaporator.
Try to build your rig someplace flat and open without a lot of brush or obstacles, and with supplies conveniently accessible. You want to be able to move freely and easily around your work area. Folks that are serious about sugaring tend to build a small structure referred to as a ‘sugar shack’ to keep their operation out of the elements. If you have the resources to build one, great! If not, finding someplace you can string up a tarp or erect a simple roof to keep your evaporator out of the rain can really help.
Concrete blocks are the bread and butter of low cost evaporator construction. Something as simple as two parallel walls of concrete blocks spaced to accommodate your pans works fine. To improve on this design, add a concrete floor to get your fire off the ground, close off a third wall, and incorporate a draft system. For a draft, you can utilize the hollow space within cinder blocks, build a small chimney with bricks, or use an old stove pipe.
Metal drums make the basis of an excellent evaporator and can often be found online for next to nothing. The drum is laid on its side and a fire built inside. Wood can be fed in the open end and holes can be cut on top to fit your pans and on the back to fit a stove pipe. I’ll use cinder blocks to get the drum off the ground and stabilize it, as well as insulate it.
Pans should be wide to create a large surface area for quicker evaporation. A single pan works fine if that is what you have, but I generally use multiple pans. It’s easier to get multiple pans of equal size than a single large pan. Your evaporator should be built specifically to the pans that you have; the more precisely your pans fit into your evaporator, the more efficiently you can process sap.
However you build your evaporator, make sure it’s good and stable. The last thing you want is for the whole thing to collapse and spill boiling sap everywhere while you're trying to learn how to make maple syrup.
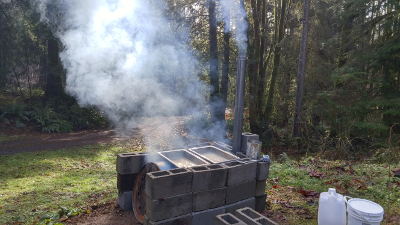
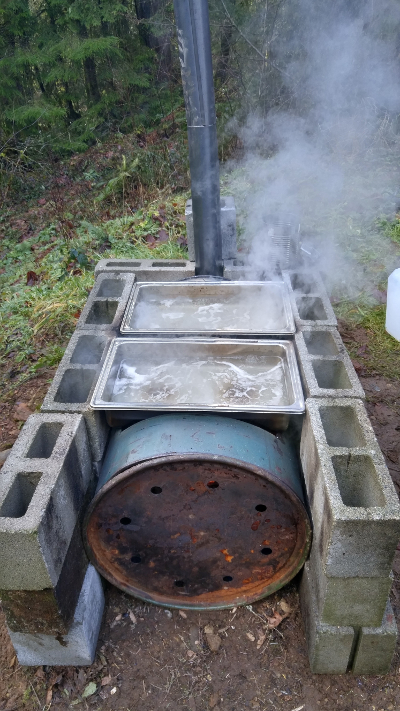
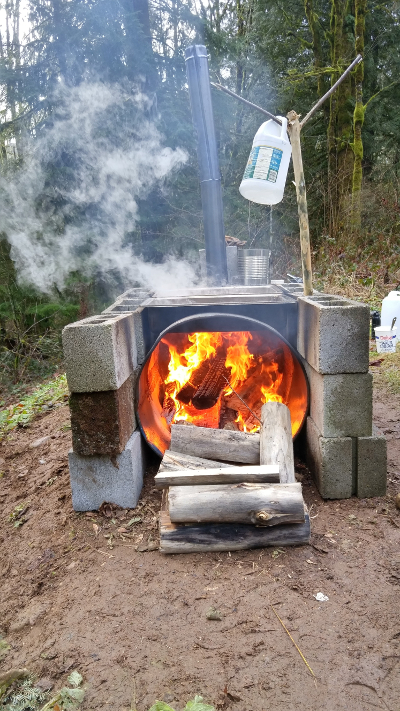 The home-made rig in action
Once your evaporator is in place you can start boiling. Boiling down any significant quantity of sap is relatively time consuming, so plan accordingly. The first few times you process sap, expect a full day. As you build experience and streamline your methods things will go quicker.
Generally speaking, the more quickly you can boil down your sap, the higher quality your syrup will be. This comes down to maintaining a blazing hot fire and building an efficient evaporator.
Once you have all your supplies in order and your sap is conveniently staged near your work space, kindle a fire in your evaporator and get your pans in place. Fill your pans with sap and continue feeding your fire until you achieve a rolling boil. You’ll want to maintain a hot fire with a strong coal base through to the end of the process when you’re getting ready to remove sap from the evaporator. It’s easy to waste a lot of time letting the fire die down and having to rebuild it.
As the pans boil down, simply add more sap. You want to avoid killing the boil by pouring too much cold sap into the pans at once, so add sap slowly and pre-warm it if possible.
This can be accomplished by adding a ‘sap injector’ to your evaporator. This is a small container with a hole punched in it that can be set or suspended above your pan. Fill this container with sap and let it slowly pour into the pan. This is also part of the beauty of using multiple pans. As each pan boils down, it can be refilled with sap from the pan to its left, and fresh sap is injected into the left-most pan. In this way if cold, fresh sap is depressing the boil in the first pan it isn’t affecting the rate of evaporation in the other pans.
You’ll notice that as the sap boils a sort of foamy scum will develop on the surface. Skim this off and discard it. This will also help remove any ash, debris, or bugs that happens to fall into your sap as it boils. A mesh skimmer is useful for this.
At this point you can settle in for the long haul. Just continue feeding your fire, adding sap, and skimming. This phase isn’t very labor intensive, but it is time intensive, and you need to keep an eye on things. During this portion of the day I like to use some of the hot sap to brew a pot of coffee or tea and relax while I keep everything moving.
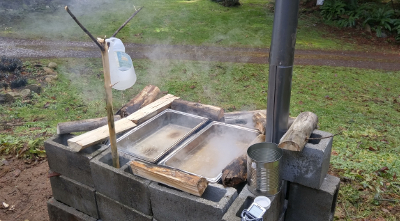 Sugaring time. Settled in for the day.
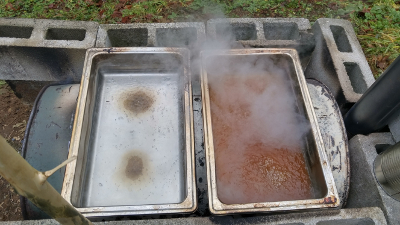 Sap moved from left to right. Sap in right pan getting close.
Continue with this process until you run out of raw sap. If you are using a multiple pan boiler set up you will continue moving sap through the system until you have all your sap in a single pan. Pans shouldn’t be removed from the boiler when empty as this would leave a large hole allowing heat to escape.
Instead, fill empty pans with water to prevent scorching and leave them in place. As you get towards the end of your batch and level sap in your pan gets lower, things will start to move a little more quickly.
As the sugar content of your sap increases so does its tendency to boil over. Make sure to remain attentive to avoid scorching your batch. You will notice a change in the consistency of the bubbles on the surface of the boiling sap. They will start to get smaller and finer, with more of a tendency to build up, similar to milk.
Boil over can happen very quickly, but an easy solution is to touch the surface with a small amount of oil. The oil will quickly ease a rising boil. It is common to keep a stick of butter handy for this purpose. At this stage it’s prudent to begin letting the fire die down and be prepared to quench it if things get out of hand.
Once your sap is confined to a single pan, you are ready to move along to your finishing stove to wrap up the boiling process part of how to make maple syrup.
Finishing:
The finishing stages of syrup production are where things can get somewhat technical and require greater care. Carelessness on the home stretch can lead to a spoiled product and a lot of wasted time.
I prefer to transfer my sap into a large pot and use an outdoor propane stove to finish my syrup. The propane stove provides a much greater degree of control over boiling and can be shut off if need be.
Finishing can also happen on your stovetop inside, but is usually slower and can introduce a lot of moisture into your home in the form of steam.
Great care should be taken when transferring sap from the evaporator the finishing stove. Remember, everything we are working with is incredibly hot and the sap tends to slosh around, creating significant potential for burns. When I am ready to remove sap from the evaporator I like to extinguish my fire completely and let everything cool off for a moment. Gloves will be required for moving pans, but the hot sap will still burn you if it spills over.
Once you have your sap on the finishing stove, bring it back to a boil and start watching the consistency and temperature. Sap is considered syrup when it reaches about 67% sugar. Unless you have specialized equipment, the way to measure this is the temperature of the boiling sap. Finished syrup will boil at 7° F above the temperature of boiling water. It is helpful to boil a pot of water and check what the actual boiling temperature is, as this can shift somewhat based on local conditions.
You will also notice a shift in consistency as the sap becomes syrup. Syrup will ‘apron’ off of a spatula dipped in the boiling liquid; rather than coming off as drops it will stick together more readily and slide off in a sheet. When you hit 7° above the boiling point and notice your syrup aproning, you’re done boiling and can go ahead and remove the syrup from heat.
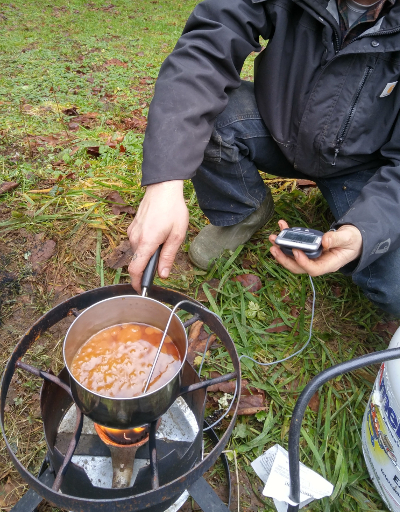 On the finishing stove, checking the temperature.
Before being stored your syrup will need to be filtered to remove something called niter, or sugar sand.
Sugar sand is basically minerals found in the sap which have been built up through the sugaring process; it’s bitter and gives your syrup a grainy consistency, so it needs to go. Filters are widely available online or at restaurant supply stores such as Cash and Carry. Cloth, paper, or synthetic filters are all acceptable.
The larger the filter is, the more convenient it will be, but I’ve even used coffee filters for a small batch.
Your syrup should be filtered while it is still hot; it will thicken as it cools and make the filtering process painfully slow. You can either filter directly into your storage containers or into an intermediate container. Once your syrup is filtered it is ready to store. Syrup is essentially shelf stable, but should be stored in a cool dry place if possible, or just refrigerated.
I typically store my syrup in mason jars, but if you want to class your product up a bit, there are numerous syrup bottles available online.
Don’t forget to treat yourself before you bottle it all up. Hot, fresh, syrup on pancakes or ice cream is hard to beat!
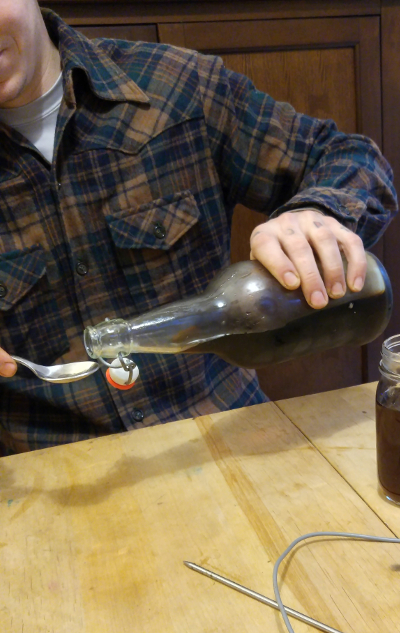 Time for a taste test!
As the season wraps up, make sure to clean up your equipment and start planning for the following year. Take some notes on what went well and what could use improvement.
And that, in a nutshell, is how to make maple syrup with bigleaf maple, or as I call it, "bigleaf sugaring". The woods are coursing with sugar; extract it and treat yourself to one of the most undervalued products in the Pacific Northwest!
By the way, a big part of why we love homesteading & permaculture skills so much is because they are a natural extension of learning about wilderness survival (both fields are all about self-sufficiency and working with nature to satisfy needs). An understanding of survival not only helps you become a better permaculturist, it empowers you with life-saving outdoor skills to keep you safe when out in nature. Right now you can get a free copy of our mini survival guide here, where you'll discover six key strategies for outdoor emergencies, plus often-overlooked survival tips.
Additional Resources on How to Make Maple Syrup
Mother Earth News article on Making Maple Syrup
Related Resources:
Learn more sustainable living skills at our Permaculture Courses.
Learn more ethnobotany at our Wild Edible & Medicinal Plants Courses.

About the Author: Jedidiah Forsyth is an experienced outdoor educator and wildlife tracker. He is a guest instructor at Alderleaf Wilderness College. Learn more about Jedidiah Forsyth.
Return from How to Make Maple Syrup to Permaculture Articles
Is The Essential Wilderness Survival Skills Course Right for You? Take the "Online Survival Training Readiness" Quiz
See for yourself if this eye-opening course is a good fit for you. It takes just a few minutes! Get your Survival Training Readiness Score Now!

Grow Your Outdoor Skills! Get monthly updates on new wilderness skills, upcoming courses, and special opportunities. Join the free Alderleaf eNews and as a welcome gift you'll get a copy of our Mini Survival Guide.

 The Six Keys to Survival: Get a free copy of our survival mini-guide and monthly tips!
Learn more