Building with Earthbags:
An Adventure in Root Cellar Construction
By Steve Nicolini
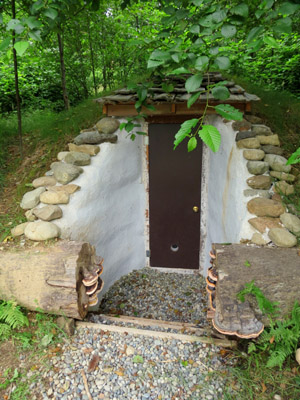
We have finally completed our 4 years-and-running earthbags building project. We wanted a natural cold storage for all of the root crops we grow here in the western foothills of Washington’s Cascade Mountain range.
This is a wonderful alternative to conventional construction. They are much less expensive and much more ecologically friendly.
The story of our earthbag root cellar begins with a man who loved to dig. This man could often be found digging the hole for our root cellar. The sound of his shovel and pickaxe would only be drowned out by his grunts and groans as he dug deeper and deeper into the earth, pulling out gigantic rocks (that would one day edge our garden beds).
The man’s perseverance and work ethic was so inspiring I decided to jump in. One day, we were throwing shovels full of dirt from the 8 ft. deep x 11 ft. wide hole in the ground when the man said, “Okay. That is deep enough.” It was time to review our notes on building with earthbags and design our cellar.
The materials needed:
- Earthbags (enough to complete your structure)
- Barbed wire
- Strong wood for door/window forms
- Drainage and foundation material (we used gravel and perforated pipe)
- Some straight pieces of wood or metal or plastic to make a compass.
- Baling twine
- Tampers (full pounders and quarter pounders)
- Levels
- Measuring tapes
- Big Old Coffee cans
The first thing we did was lay out the drainage and foundation, which are essential for any structure. Around the outside of the bottom of the hole we laid a 4 in. perforated pipe on a 4% grade down and out of the structure. We then dumped in a 1 ft. depth of large rounded gravel and tamped it to level. This gravel would be our foundation and our floor.
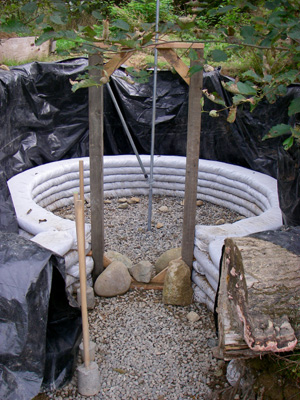
The next step was to find the exact center of our round structure-to-be and set our compass. We used some old chain link fence parts with an L-bracket lashed onto them to make our compass. It was essential for creating a perfectly round structure. It also aided us in the decrease in radius with each rising course of earthbags.
Laying down courses of earthbags requires quite a bit of moving and shaking. We called up our friends to come help with the dance. (You should have a lot of friends if you want to build an earthbag structure.)
The Process of Building with Earthbags:
It goes something like this:
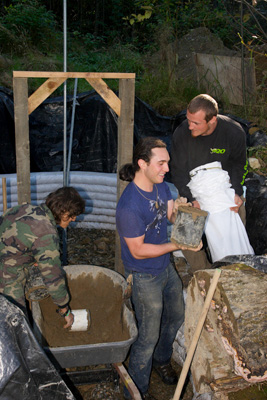
1) “Filler” fills coffee can with subsoil, being careful to not include living topsoil, vegetation, and sharp stones
2) “Pourer” dumps dirt into the mouth of the earthbag, which is held by the “Layer”
3) “Layer” moves and shakes the dirt down into the earthbags and sets the bag into its resting position (this was my favorite thing to do)
4) Repeat until full course is laid
5) “Tamper” tamps down the course with a full pounder
6) “Barber” nails down two lengths of barbed wire across course (this was my least favorite…)
The first two courses of our structure had somewhere between a 10 and 20% mix of concrete in with the dirt. After those two it was just the dirt that came out of the ground.
Be More Prepared For Your Next Outdoor Adventure!
Don't leave without knowing these six essential survival skills. Our free survival mini guide reveals the strategies of:
- Shelter & fire to prevent the number one cause of death
- Obtaining clean water to avoid life-threatening dehydration
- Common wild survival foods and other critical skills!

I am not going to get into the geometry used to indicate the reduction in radius length with each course of earthbags. When you are designing your structure, you should reference Earthbag Building, by Kaki Hunter and Donald Kiffmeyer. Just know that with each course there is a decrease in the radius of the course that is exponentially larger than the previous decreases.
Our buttress walls are just straight sections of earthbag interlocked in with the main structure at the door form. Each course of the buttress wall decreased in length to parallel the slope of the hillside.
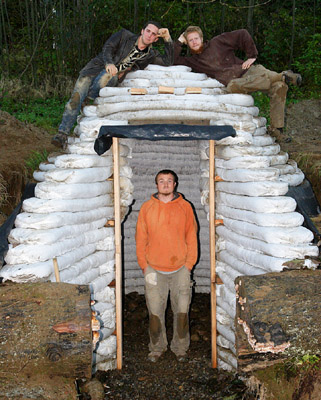
After all the filling and tamping and laying and barbing, we had finally enclosed the structure. We then proceeded to cover it with two layers of really thick polyethylene. Then we backfilled with the rest of the soil and buried the beast.
It wasn’t until the following year that the earthbag layers were plastered. We used a traditional lime plaster for these two reasons: a wall made of earth needs to breathe (cement stucco doesn’t let out water vapor) and lime holds up to moisture very well (the cellar is underground, making it pretty moist). I learned the plastering process from The Natural Plaster Book: Earth, Lime, and Gypsum Plasters for Natural Homes by Cedar Rose Guelberth and Dan Chiras.
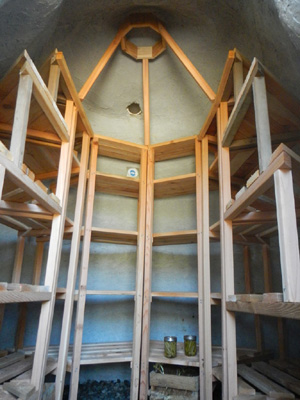
The shelves we built were an architect’s dream and a builder’s nightmare. Regardless, they turned out pretty good (thanks for the design, Jamie). Our main considerations in shelf design were airflow and space utilization. In retrospect, it would have been more beneficial to incorporate shelf brackets into the earthbags themselves versus building freestanding shelves.
So far we have about a dozen jars of pickled peas, half dozen jars of pickled radishes, and a crate of potatoes in the cellar. After the harvest this year it should get at least ½-full.
By the way, a big part of why we love homesteading & permaculture skills so much is because they are a natural extension of learning about wilderness survival (both fields are all about self-sufficiency and working with nature to satisfy needs). An understanding of survival not only helps you become a better permaculturist, it empowers you with life-saving outdoor skills to keep you safe when out in nature. Right now you can get a free copy of our mini survival guide here, where you'll discover six key strategies for outdoor emergencies, plus often-overlooked survival tips.
Recommended Earthbag Resources:
Earthbag Building by Kaki Hunter and Donald Kiffmeyer
What is Superadobe - CalEarth
Related Courses:
Permaculture Courses at Alderleaf

About the Author: Steve Nicolini is an experienced permaculturist and wilderness skills instructor. He taught at Alderleaf for a number of years. Learn more about Steve Nicolini.
Return from Building with Earthbags back to Permaculture Articles
Is The Essential Wilderness Survival Skills Course Right for You? Take the "Online Survival Training Readiness" Quiz
See for yourself if this eye-opening course is a good fit for you. It takes just a few minutes! Get your Survival Training Readiness Score Now!

Grow Your Outdoor Skills! Get monthly updates on new wilderness skills, upcoming courses, and special opportunities. Join the free Alderleaf eNews and as a welcome gift you'll get a copy of our Mini Survival Guide.

 The Six Keys to Survival: Get a free copy of our survival mini-guide and monthly tips!
Learn more