Hand Drill Fire

By Chris Byrd
Making a hand drill fire is a traditional method used to start fires in dry, low humidity climates. As opposed to the bow drill which has five components, the hand drill set-up is relatively simple, only requiring two components: the spindle and the hearth board. Despite the relatively simple set-up, hand drill fire can be a challenge to master, especially in wet climates with high relative humidity.
Constructing a Hand Drill Fire Kit
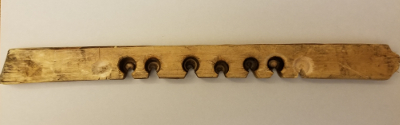 Hearth board (aka fireboard)
Hearth board: The hearth board should consist of dry wood that is still structurally intact (not highly decayed) and about ¼ of an inch in thickness. Make sure your board is flat so that is does not rock during use, and long enough to pin the board to the ground with your foot. Ideally, the board should be wide enough to accommodate a series of holes running down both sides of the board.
The wood used to create the hearth board should be relatively soft. If you need to determine how soft your hearth board is press your thumbnail into the wood. If your nail marks the wood (leaves an indentation) then it is softwood and you may have an appropriate wood (if your nail makes too large of a mark the wood may be in an advanced decay stage and therefore unusable).
In the coastal Pacific Northwest the best woods to use for hearth boards are: western red cedar (Thuja plicata), willow (Salix spp), and black cottonwood (Populus balsamifera trichocarpa).
In the interior northwest quaking aspen (Populus tremuloides) is another viable option in selecting your hearth board.
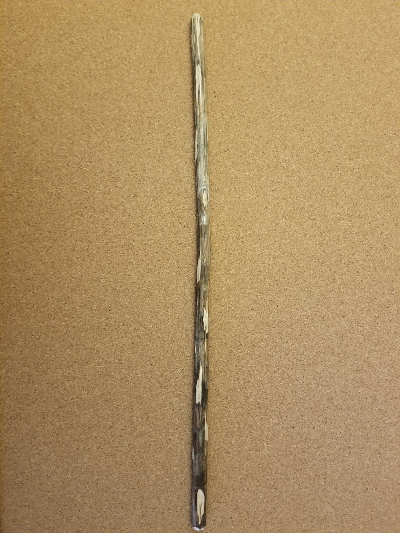 Spindle
Spindle: The second piece of your hand drill fire kit is the spindle. The spindle is a dead plant stalk (ideally a species with a pithy center) that is approximately 16-24 inches in length, and about the diameter of your pinky finger (approximately 1/4th inch). Spindle diameter is to an extent a matter of preference, however, keep in mind that a thicker diameter spindle spins slower which can prevent a coal from forming if you are using a harder wood for your board. Conversely, a thinner spindle will increase your RPM’s, but may result in burning through your board without getting a coal.
The ideal spindle is straight (or very nearly so) and has few inconsistencies along its surface that will interfere with the movement of your hands up and down the spindle.
In the Pacific Northwest good spindle woods include: mullein (Verbascum thapsus), cattail (Typha latifolia), elderberry (Sambucus spp), salmonberry (Rubus spectabilis), big-leaf maple (Acer macrophyllum), butterfly bush (Buddleja offininalis), and willow (Salix spp).
Carving a Notch
 Notch
NotchThe next step in the hand drill fire process is carving a notch. First select the area of your hearth board where you wish to locate your first notch. Next, take the tip of your knife and begin carving a shallow depression about 1/8th of an inch from the edge of your fireboard. Once your depression is large enough to accommodate the end of your spindle begin by drilling down into your board until you see smoke; and a blackened bowl-shaped depression has been burned in.
Next carve out a pie-shaped notch. The notch should reach almost to the center of your depression and take up about 1/8th (45 degrees) to 1/6th (60 degrees) of your burned in depression's circumference.
Creating a Coal
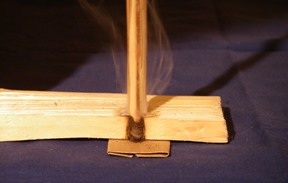
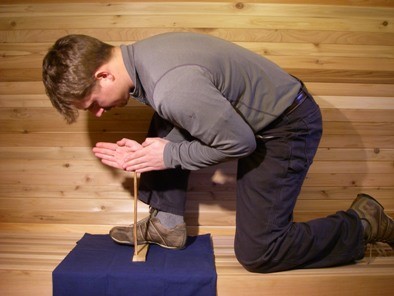 Upright Stance
Stance: There are several ways that you can position your body while working the spindle into your hearth board. Some people adopt a sitting position, while others prefer a more upright position (similar to the standard bow drill position) with one knee on the ground, and the opposite foot stepping on (and pinning) the fireboard.
Be More Prepared For Your Next Outdoor Adventure!

Don't leave without knowing these six essential survival skills. Our free survival mini guide reveals the strategies of:
- Shelter & fire to prevent the number one cause of death
- Obtaining clean water to avoid life-threatening dehydration
- Common wild survival foods and other critical skills!

With a hand drill fire, creating downward pressure with your spindle is a major challenge, and your choice of stance needs to comfortably allow you to apply maximum downward force without compromising your physical stamina.
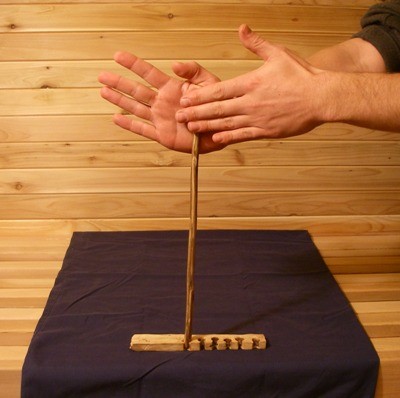 Floating
Drilling Techniques: Begin warming up your hearth board using a technique known as floating. To float, move your hands so that one hand is moving in a diagonal plane against the other hand to spin the spindle. Keep your hands relaxed and try to keep them at the top of the spindle.
After you have sufficiently warmed up your board you can begin increasing your RPM’s and downward pressure by moving your hands down the spindle as you spin the spindle back and forth. Some people use their fingers as well as the palm of their hands to work their spindle, while others use only the palms of their hands.
The first few times working your hands down the spindle, apply only moderate downward pressure. You want to be continuing the process of increasing the temperature of your notch while beginning to fill your notch with dust.
As you work the dust will change from a light brown, to a darker brown, and then to black, while the amount of smoke emanating from the notch will increase.
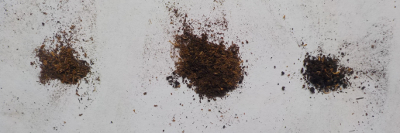 Progression of dust from lightest (left) to darkest (right)
As you work watch for the moment when smoke begins rising from the dust in your notch, and not just from the notch itself.
Once the smoke is arising from the dust, stop drilling. You can then then lightly fan the coal with your hand. Fanning the coal adds oxygen to the coal thereby encouraging the coal to grow. Don’t breath too close to the coal at this point as your breath is humid, and humidity is the enemy of your coal.
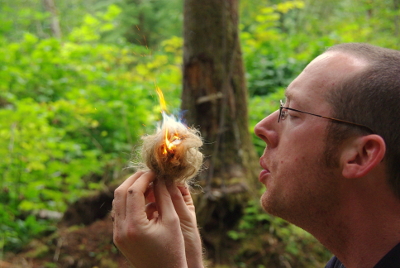
Once you see the red glow of smoldering embers inside your coal, you can add the coal into a tinder bundle and carefully blow the tinder bundle into a flame.
Troubleshooting
If you are having difficulty getting a coal make sure and check your notch. When using a pith-centered stalk, the pith will burn off at a differential rate as compared to the harder outer portion of your spindle. You can carefully shave off the outside of the spindle tip if the center becomes significantly depressed in relation to the outside of the spindle. The same series of events will also lead the bottom of your notch to become convex. Take the tip of a knife and pop off the convex cap of the notch.
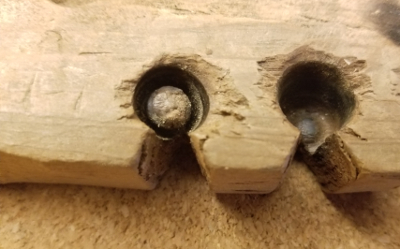 Remove convexities at the bottom of your notch
Conclusion
Using a hand drill to make a friction fire is a challenging and rewarding experience that takes practice and patience. If you can persevere through the difficulties and achieve success you will have made a fire in one of the most elemental ways possible.
By the way, if you enjoyed this article then you'll love our survival mini guide. You'll discover six key strategies to staying alive in the outdoors plus often-overlooked survival tips. We're currently giving away free copies here.
Additional Resources:
Hand Drill Fire Making Articles on the Wildwood Survival site
Learn about Wilderness Survival Courses at Alderleaf

About the Author: Chris Byrd is an instructor at Alderleaf. He has been teaching naturalist skills for over twenty years. Learn more about Chris Byrd.
Return from Hand Drill Fire Article back to Wilderness Survival Articles
Is The Essential Wilderness Survival Skills Course Right for You? Take the "Online Survival Training Readiness" Quiz
See for yourself if this eye-opening course is a good fit for you. It takes just a few minutes! Get your Survival Training Readiness Score Now!
Grow Your Outdoor Skills! Get monthly updates on new wilderness skills, upcoming courses, and special opportunities. Join the free Alderleaf eNews and as a welcome gift you'll get a copy of our Mini Survival Guide.
 The Six Keys to Survival: Get a free copy of our survival mini-guide and monthly tips!
Learn more
Wait. Before you leave...
Don't forget your Survival Mini Guide.
It's free.
Be more prepared for your next outdoor adventure! Discover six essential survival skills. Join our newsletter and get a free copy of the guide as a welcome gift!
Your privacy is our top priority. We promise to keep your email safe!